Departments in Jirav help you plan, analyze, and generate reports more effectively. When planning, you can create department-level plans that automatically roll up into the overall company plan. In reports and dashboards, departments allow you to break down data for deeper insights and more meaningful actual vs. budget variance analysis.
Be Aware: Departments are not available in all levels of Jirav. Contact your Partner Success Manager to learn more about adding Departments.
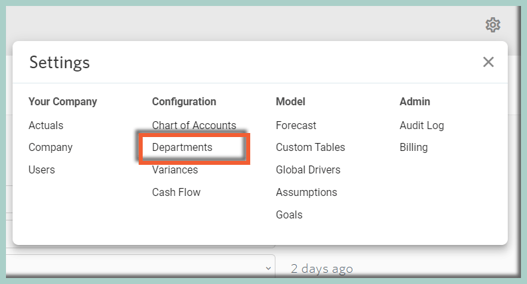
To manage your Jirav departments, go to Settings ⚙️> Departments:
There are 3 columns associated with Departments:
- MASTER: These are the Departments available within Jirav Plans, Dashboards, and Reports.
- ACCOUNTING*: These are the Departments from your accounting system. *This is the middle column and the header will reflect the name of your accounting system, e.g., QUICKBOOKS, XERO, NETSUITE, etc.
- WORKFORCE: These are the Departments found in your workforce import.
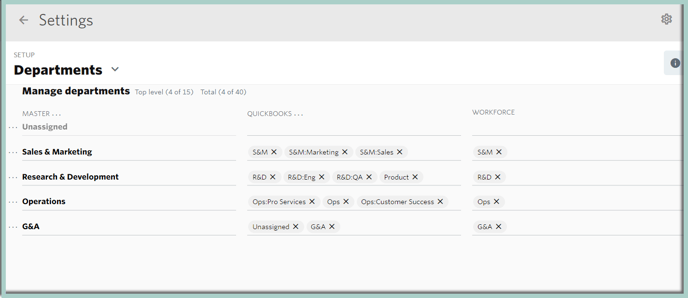
These 3 columns allow you to create a mapping between the 3 systems: Jirav, Accounting, and Workforce. For example, if the Accounting System has a G&A Department and the Workforce System has an Admin Department, they can be mapped to a common Jirav Department of Admin.
Configure MASTER Departments
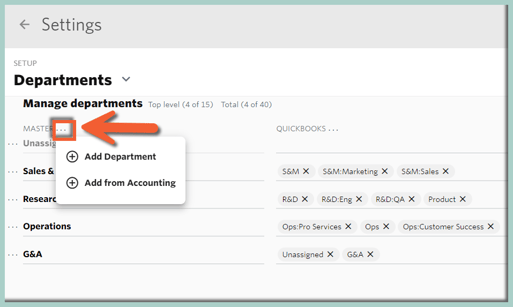
The first step you should take in the Department screen is to configure the MASTER departments, which will be available throughout your Jirav model.
To configure the MASTER Departments, select the ![]() Ellipsis to the right of MASTER to open the context menu, then choose one of the following:
Ellipsis to the right of MASTER to open the context menu, then choose one of the following:
- Add Department: Manually add a Department to Jirav
- Add from Accounting: Automatically generate new Departments based on what is in your Accounting System
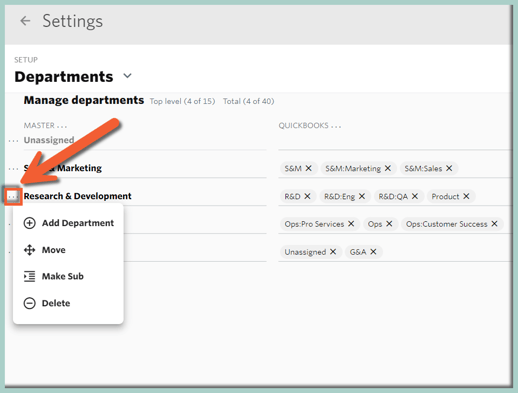
To manually add a new MASTER Department, you can also click the ![]() Ellipsis left of a Master Department line to access the context menu:
Ellipsis left of a Master Department line to access the context menu:
Did you know?
The segment representing the Department from your accounting system will differ based on which accounting system you use, as defined below.
- QuickBooks (Online & Desktop): Class or Location
- Xero: Tracking Category of your Choice
- NetSuite: Department
- Sage Intacct: Department or Location
Map Accounting & Workforce Departments
Once the MASTER Departments are defined, map the values in the Unassigned row of the Accounting System & Workforce columns accordingly. This is done by clicking in the row & column where you'd like to establish the mapping, selecting the applicable Department, and then Saving.
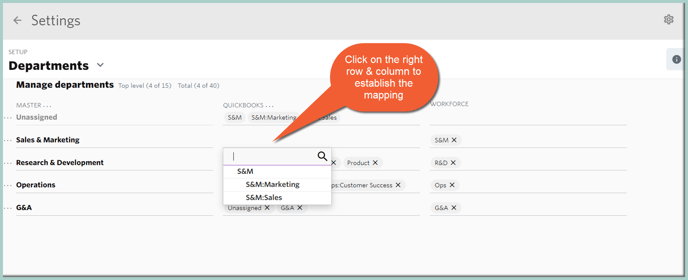
Helpful Hint:
If you don't see any Departments in the Unassigned row to map in the Workforce column, you need to import your current employee roster. Likewise, if you don't see any Departments to map in the Unassigned row of the Accounting column, you need to integrate your accounting system.
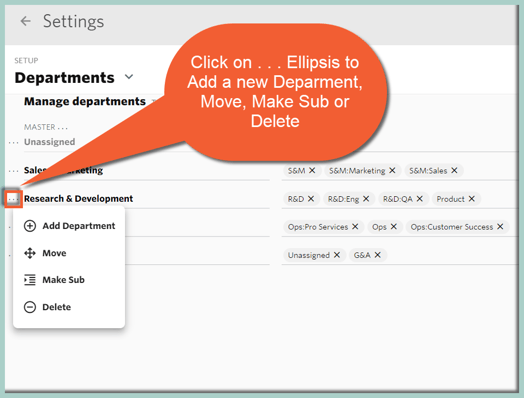
Adding, Creating Subs, Moving & Deleting Departments
If you need to edit your department structure, hover to the left of a MASTER Department row and click ![]() Ellipsis to activate the context menu. This context menu allows you to perform a few different actions:
Ellipsis to activate the context menu. This context menu allows you to perform a few different actions:
- Add Department: Add a new Department - this is the same action that will occur when selecting Add Department from the MASTER context menu
- Make Sub/Make Parent: Create a hierarchy within the Department structure
- Move: Move a Department within the structure
- Delete: Delete a Department
Be Aware:
Deleting a Department will delete all Plan data in all Plans unless it is a Plan of Record. Actuals and Workforce data will simply move to the Unassigned department.
Helpful Hints
- Actuals will appear as "Unassigned" until the mapping is completed.
- Jirav accounts connected to Xero can choose the tracking category of their choice to map to the Jirav Department. Select the . . . Ellipsis to the right of the XERO column to choose the desired Xero tracking category. Click here to learn more about tracking categories & Jirav.
- Jirav accounts connected to a QuickBooks instance with multiple dimensions enabled will be prompted to select one during the initial import. Click here to learn where you can change the selected dimension.