Article Contents:
- Invalid COA Structure
- No Retained Earnings Accounts or Multiple Retained Earnings Accounts
- Income Statement Actuals Not Matching QuickBooks
- Unable to Parse
Invalid COA Structure

An invalid COA structure error typically occurs when a Chart of Accounts (COA) import from QuickBooks includes an account that references a missing or incorrect parent account, often due to the parent being deleted or an inconsistent structure in the QuickBook Chart of Accounts.
To resolve this issue, first check QuickBooks to review the accounts specified in the Jirav error message for any necessary updates. If needed, you may need to contact Intuit Support for assistance in correcting the account structure.
If you'd like to proceed without making changes in QuickBooks, Jirav Support can help adjust the import to allow it to go through. Please submit a support ticket, and our team will assist you.
No Retained Earnings Accounts or Multiple Retained Earnings Accounts

Jirav automatically identifies Retained Earnings by looking for an Equity account containing the phrase "Retained Earnings." If multiple accounts match or no accounts meet this criteria, a warning is issued. To resolve this error please either email support@jirav.com or submit a support ticket.
Income Statement Actuals Not Matching QuickBooks
If your Income Statement actuals in Jirav don't match QuickBooks Online (QBO), there may be a few common causes. Use the checklist below to resolve discrepancies.
✅ 1. Refresh Actuals Imports from QuickBooks to Jirav
Jirav automatically syncs with QuickBooks nightly for the current and previous month. If a historical adjustment is made in QuickBooks after the initial sync, discrepancies can occur.
Steps to Resolve:
-
Go to Jirav > Settings > Integrations.
-
In the QuickBooks section, click Import and select a longer date range to reimport your data.
✅ 2. Check Category Tracking in QuickBooks
Discrepancies can occur if transactions were created using Classes and/or Locations in QBO, but tracking for those was later disabled.
Steps to Resolve:
-
In QBO, go to Gear Icon > Account and Settings > Advanced.
-
Scroll to the Categories section.
-
Enable Track Classes and/or Track Locations.
-
Reimport your data into Jirav: Jirav > Settings > Integrations, then click Import in the QBO section.
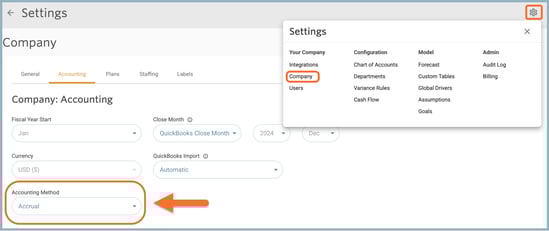
✅ 3. Confirm Your Accounting Method in Jirav
Make sure your Jirav account is using the correct Accounting Method (Cash or Accrual). A mismatch can result in differences from QBO.
Steps to Resolve:
-
In Jirav, go to Settings ⚙️ > Company > Accounting.
-
Choose the appropriate Accounting Method that matches your QBO settings.
-
Then go to Settings > Integrations and reimport your data.
✅ 4. Look for Duplicate Class Names in QuickBooks
Duplicate class names in QBO can lead to missing actuals in Jirav.
QuickBooks may send the value of one class name twice if two classes share the exact same name, and omit the second one entirely.
Workaround:
-
In QBO, check for duplicate class names.
-
Rename each class to ensure it has a unique name.
-
After making changes, go to Jirav > Settings > Integrations and reimport your data.
Error: “Unable to parse P&L report columns (missing ID for non-total class: [Class Name])”
An Unable to parse P&L report columns (missing ID for non-total class: [Class Name]) typically occurs when there are duplicate parent class names in your QBO setup.
Jirav relies on class names from QuickBooks to establish a hierarchy and correctly map data during import. If multiple parent classes share the exact same name, the system may become unable to distinguish between them, which can lead to import errors or missing data.
To resolve this issue, ensure that all parent classes in QuickBooks have unique names, even if they serve similar functions.
Example: If you currently have several parent classes with the same name, e.g., Operations, consider slightly modifying each to differentiate them, such as:
-
Operations→Operations (HQ) -
Operations→Operations (Division A) -
Operations→Operations (International)
Once the class names are updated:
-
Go to Jirav > Settings > Integrations
-
Click Import to pull in the updated class structure
✅ Still Need Help?
If you've tried all of the above and you're still seeing issues, please reach out to our support team. We're happy to help!