Once you have connected to your Accounting System, the Chart of Accounts (COA) in Jirav will automatically reflect an exact mirror of the COA from your accounting system. If desired, the COA can be customized within Jirav to fit your planning requirements without impacting the COA in your accounting system.
To review your Chart of Accounts, navigate to Settings ⚙️ > Chart of Accounts.
Why would I want to customize my COA?
Often times the structure of GL accounts from your accounting system is not at the same level of detail needed for planning & reporting. A couple of examples:
- Cash is a key metric that we will plan, but you may wish to plan for cash in total rather than planning out the balance of each individual bank account in your GL, i.e., Operating Cash, Petty Cash, Money Market, Clearing, etc.
- If Operating Expense accounts do not have a hierarchy in your accounting system, you may wish to add rollup accounts to group together similar expenses, e.g., you could create a rollup for Personnel Expenses that includes the Salaries & Wages, Payroll Tax, Benefit & Bonus GLs.
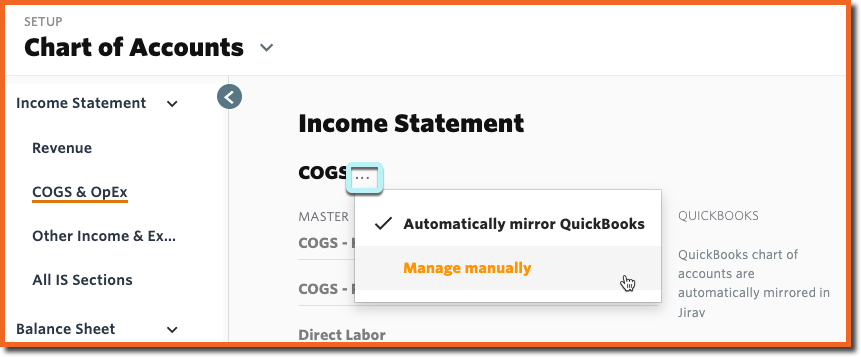
Automatically Mirror or Manage Manually
The Jirav COA is organized by account type, i.e., Revenue, COGS, OpEx, Other Income & Expense, Assets, Liabilities & Equity and will initially exactly mirror your accounting system. If this is the desired setup for Jirav, then no additional action is needed.
To override the initial system setup, select the ellipsis (. . .) to the right of the account section that should be customized to access the context menu, then select Manage Manually and Save.
Customize the Chart of Accounts
The Master column on the left represents the COA in Jirav and the Accounting column on the right represents the COA per your accounting system, e.g., QuickBooks.
Rename Account
To Rename an account, place your cursor in the left (MASTER) column for the account you'd like to rename, rename the account and Save Changes.

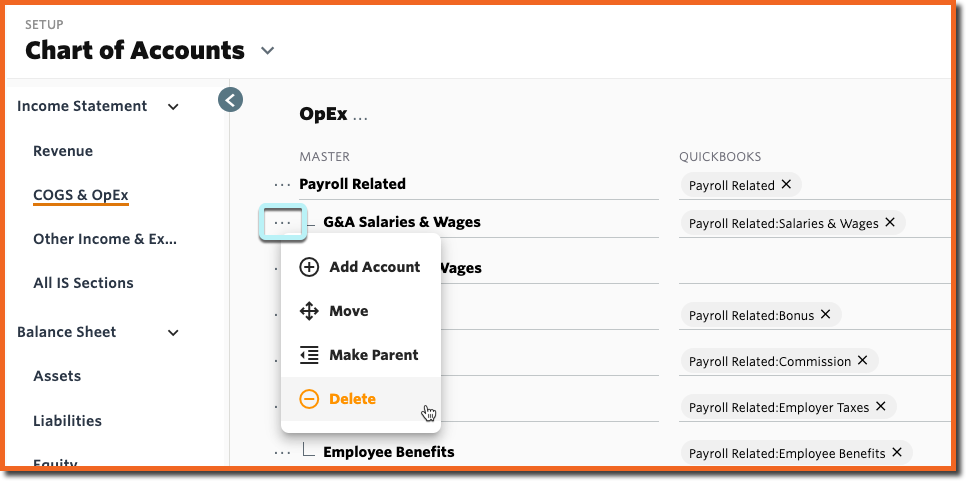
Add, Move, Delete or Adjust the Parent/Child Relationship
To Add Accounts, Delete Accounts, Move, or Reparent Accounts select the ellipsis (. . .) to the right of the applicable account in the left (MASTER) column to access the context menu and make the appropriate selection. Save Changes when you have completed your changes.
Remapping Accounts
To map multiple Accounting Accounts to the same Jirav account, follow these steps:
- Remove the Existing Mapping
Select the "X" next to the name of the account that should be renamed from the right (ACCOUNTING) column to remove the current mapping. This will move the account to the system-generated "Unmapped" row within the given section of the COA. - Establish the New Mapping
Click into the white space of the right (ACCOUNTING) column next to the account where the unmapped account should be remapped and select the desired account. - Delete Unused Master Account (Optional)
If desired, delete the Master Account if there is no longer any data mapped to it. - Save Changes.
-gif.gif)
Helpful Hints:
- After choosing to Manage Manually, be sure to Save before and after making your customizations.
- When a new account is added to the accounting system in a section of the Jirav COA that is managed manually, then that new account will appear in the "Unmapped" section of the Chart of Accounts until you map it.
- It is not possible to move, rename or delete Jirav system accounts that are grayed out, e.g., Other Income or Cash
Additional Sources:
- Learn more about the Impact of Changes Made to the Accounting System COA