You can reference historical trends and assume a multiplier to create a high-level revenue forecast.
Be Aware: The example below is a simple methodology used for revenue planning. This example should be adapted as needed to fit your business planning requirements.
To configure a simple revenue forecast for product revenue by looking at last year and assuming a 5% increase, follow the steps below.
Step 1: Define the Assumption Table & Multiplier
Setup ⚙️> Assumptions > (optionally: Manage Tables > Add Assumption Table > Name the table Revenue Assumptions)
Step 2: Add Assumption for Revenue Multiplier

Step 3: Populate the Assumption in the Plan
Plan > Assumptions > All > Populate the Revenue Multiplier and Save
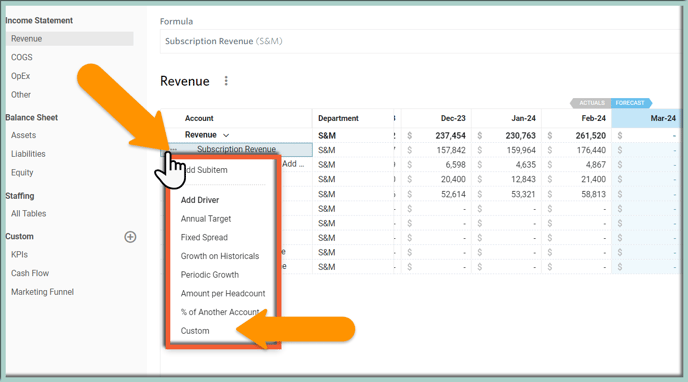
Plan > Revenue > . . . next to the right Account (here: Subscription Revenue) > Add Driver > Custom:
Step 5: Configure the Revenue Driver
-
- Populate the Name with "LY + 5%"
-
- Populate the Driver to refer to the value of the Product Revenue account for the same month the previous year

- Populate the Rate to refer to the Multiplier Assumption created in Step 1

- Leave ƒx, Start & End with the default settings.

- Populate the Driver to refer to the value of the Product Revenue account for the same month the previous year
This driver will now return the Product Revenue for the same month from the previous year in your plan. For example, if the Subscription Revenue for March 2023 was $10,000, the forecast for March 2024 will also be $10,500.
Helpful Hints:
- This example assumes that the Product Revenue has seasonality so it makes sense to look at the same month from the previous year. Explore using other Ranges & Reductions, for example, you could use a Trailing 3 months Average.
- The Driver's Output Data Element is a shortcut to refer to the same account & department you are adding the driver to, i.e., S&M Product Revenue

- The Range This Month Last Year in Step 4 is not a default range - to add this range select +ADD from the Ranges window, select the settings in the screenshot below and Save.
