The NetSuite integration utilizes token based authorization in NetSuite which must be set up prior to establishing the connection in Jirav. Please be advised that you may need to contact your NetSuite admin and/or IT department for assistance with updating your NetSuite user role permissions to perform the steps outlined in this article.
Article Contents
Initial Connection Instructions
To get started, import the chart of accounts, account balances, and optionally, a department structure from NetSuite following these steps. This is done by obtaining several keys from NetSuite. Be sure to copy these to a separate document as you go through the steps.
Step 1: Enable Token-based Authorization in NetSuite
- In NetSuite, go to Setup > Company > Enable Features > Suite Cloud > Manage Authentication.
- Enable Token-Based Authentication.
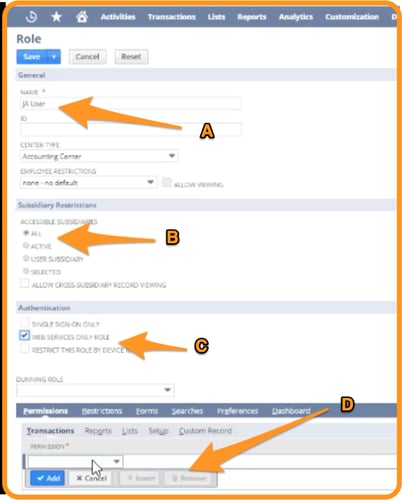
Step 2: Create a User Role for the Jirav Integration in NetSuite
- In NetSuite, go to Setup > Users/Roles > Manage Roles > New and name it "JA User". [A]
- Select subsidiaries per your requirements. [B]
When setting up most integrations, you will typically choose "All" for the accessible subsidiaries.
If you only want to import data from a specific subsidiary, you can select "Selected" and then choose from the dropdown list accordingly. Additionally, there is a setting that needs to be enabled within your Jirav account to enable this functionality. Submit a support ticket or email support@jirav.com to have this enabled. You can proceed with the rest of the integration steps, as this setting will not disrupt the connection.- Enable "Web Services Only Role". [C]
- Add the specific permissions listed in the instructions below. [D]
- Permissions Required: Permission to 'View' is necessary for these capabilities; some of them have 'Full' access which cannot be altered.
- Lists
- Lists | Accounts
- Lists | Classes - - can be renamed
- Lists | Companies - can be renamed
- Lists | Currency
- Lists | Departments
- Lists | Locations (If applicable)
- Lists | Perform Search
- Lists | Subsidiaries
- Reports
- Reports | Account Detail
- Reports | Accounts Payable
- Reports | Accounts Receivable
- Reports | Balance Sheet
- Reports | Budget
- Reports | Cash Flow Statement
- Reports | Financial Statements
- Reports | Income Statement
- Reports | Transaction Detail
- Reports | Trial Balance
- Setup
- Setup | Accounting Lists
- Setup | Company Information
- Setup | Deleted Records
- Setup | Enable Features
- Setup | Log in using access Tokens
- Setup | Manage Accounting Periods
- Setup | Set Up Company
- Setup | Set Up SOAP Web Services
- Setup | View SOAP Web Services Logs
- Setup | SOAP Web Services - this is ‘Full’
Step 3: Assign the "JA User" User Role to a NetSuite User
- In NetSuite, assign the JA User created in Step 2 to a new or existing NetSuite user within your instance.
Please reference this article from NetSuite for additional information how to perform this step. Note, you may be prompted for your NetSuite credentials to access this article.
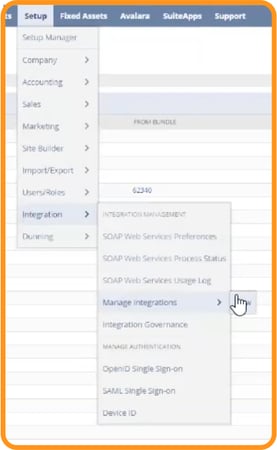
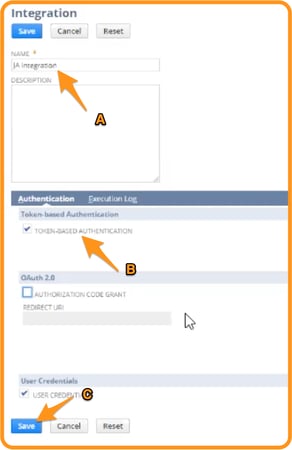
Step 4: Obtain the Consumer Key & Consumer Secret
- From NetSuite, navigate to Setup > Integration > Manage Integrations > New.
- Name the integration "JA Integration". [A]
- Check "Token-Based Authentication". [B]
- Check "User Credentials" and Save. [C]
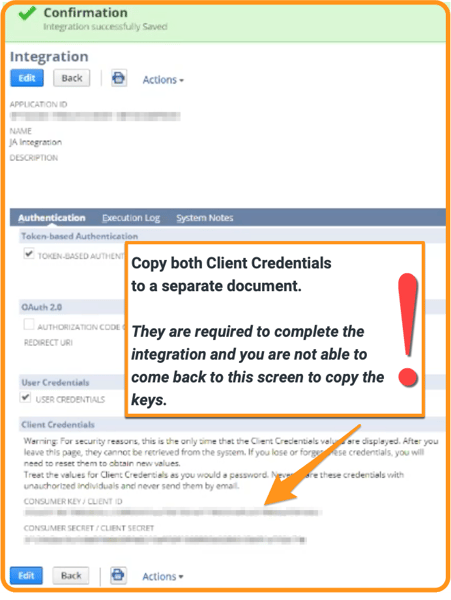
- Copy the provided Client Credentials to a separate document. You will need these credentials later on in the setup process.
After generating the Client Credentials, make sure to carefully note down the Consumer Key / Client ID and Consumer Secret / Client Secret as they will only be shown once. This information is crucial for Jirav to synchronize data. Remember, you won't be able to revisit this screen to retrieve the credentials.
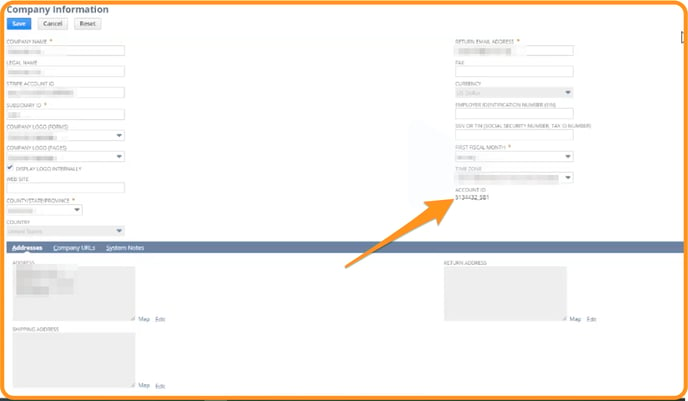
Step 5: Obtain the Account ID
- From NetSuite, locate the Company ID under Setup -> Company Information and copy it to a separate document. You will need this ID later on in the setup process.
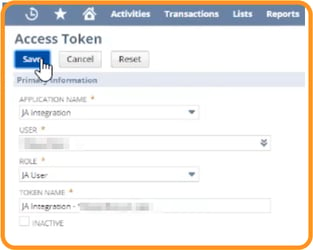
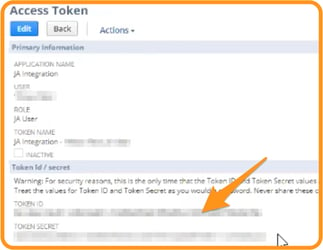
Step 6: Create the Access Token
- The Access Token can be found under Setup or by searching for "Access Token" in NetSuite.
- Copy the Token ID and Token Secret to a separate document. You will need these tokens later on in the setup process.
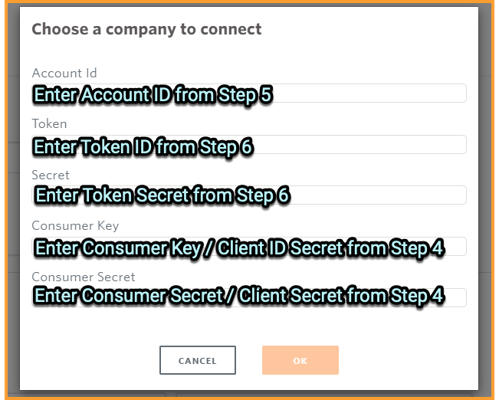
Step 7: Connect your NetSuite account to Jirav
- Now that you have obtained all of they keys from NetSuite for the token based authentication, login to your Jirav account and navigate to Settings ⚙️ > Integrations.
- Locate NetSuite in the Actuals: Accounting section and click Connect.
- You will then be prompted for your NetSuite credentials. Enter the Account Id [Step 5], Token [Step 6], Secret [Step 6], Consumer Key [Step 4], Consumer Secret [Step 4] and click OK.
- Review the date range prompt and click Import.

After completing these steps, you will receive a confirmation indicating that the data import was successful. This confirms the successful establishment of the connection, and you will see the Connect button replaced with an Import button.
You can now go start exploring dashboards, reports & plans!
Did you know?
The integration between NetSuite and Jirav will run automatically every night for the current and previous month. To refresh the data immediately, or to reimport a historical period, navigate to Settings > Integrations and click the IMPORT button.
Jirav Departments & NetSuite Departments
The NetSuite Department dimension can be brought into Jirav to plan, analyze, and report.
To enable this feature, go to Settings ⚙️ > Departments and map the department values in the NETSUITE column to their corresponding Jirav Departments by clicking in the white space to the right of Jirav department.
Helpful Hints:
- Using Departments is not mandatory - If your company does not currently utilize Departments, you can simply plan at the company level in Jirav
- Jirav currently only supports the Department dimension from NetSuite
- Click here to learn more about Departments in Jirav
- Having trouble connecting? Please reference our NetSuite Troubleshooting article.