
Leverage Jirav to recognize Deferred Revenue and Subscriptions Bookings
This article will walk through an example of using the Jirav product to record Deferred Revenue with associated billing and Recognize Revenue from the deferral.
This is a good way to simplify your three-way financials forecast while leveraging other systems to manage your Subscription Revenue.
Step 1:
The first thing is to set up a Balance Sheet Custom Table by going to Settings⚙️> Custom tables > click on the "+" icon to add a new Custom table > name it "Balance Sheet".
To learn about Custom Tables refer to this Help Article.
We will want a Custom Table that has a line for New Billings and Recognized Revenue; see the screenshot below for the setup.

Now that we have defined the custom lines we can then go to Plan > Balance Sheet Custom Table:
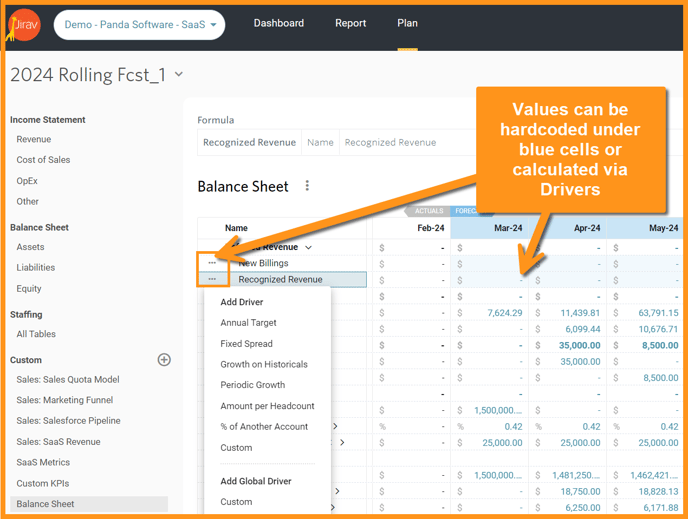
As noted in the screenshot above we will enter the amounts into the table directly under blue rows or alternatively you can create Drivers, for example, Revenue Recognized can be simply based on the All Revenue: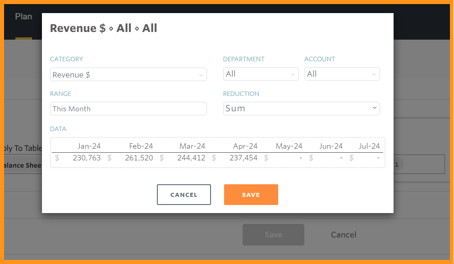
Step 2:
The next step is to set up the Balance Sheet Drivers by selecting the fx from the left menu, locating the Balance Sheet section, and selecting + Add Driver.
Record the Billings to the Deferred Revenue Liability account as Driver Increase and offset Revenue Recognized (Driver Decrease):

Learn how to create Balance Sheet Drivers in this Help Article.

|
The output of the drivers created are both to the Deferred Revenue Account, one is increasing the account and the other is decreasing the account. The Increase is for the Billings that we will enter into the Custom line we created in step 1 and the Decrease is the amount of Revenue Recognized that is also driven by the amount we will enter into the Custom line we created in step 1. |

|
The Driver of the formula in both instances is the Custom lines we created in step 1 - one driver is for the Billings and the second is for the Recognized Revenue. |

|
The amount that we entered into the custom line is then simply multiplied by 1 to calculate the exact amount we enter into the custom line |
|
This is a driver that we would like to have evaluated for the entire time the model is forecasted so we choose to start at the Cutover date (Plan Start Date) through the Maximum time of the model - learn more about this in our Plans Management Help Article |
Step 3:
Now that we have all the financial model dependencies created let's enter in amounts to the custom line and trace the amounts through plans and reports; let's start with entering in values for the custom lines for the new billings which will result in a deferred revenue balance as well as the recognized revenue that will decrease the liability and also flow through the income statement as revenue.
Go to Plan > Balance Sheet Custom table and populate the amounts:

Next, let's go look at the Balance Sheet section by going to Liabilities

Balance Sheet Driver Output - This is the row in the table that is the account "Deferred Revenue" which is what was selected as the Output when the Drivers were created. Note that the balance in the row for the forecasted months is additive of all the rows beneath it; in other words - Jirav is giving you all the details of the increase and decrease to the account that is rolling up into the balance.
Balance Sheet Driver Increase & Decrease - These are the drivers we created to increase the Liability for Billings and decrease the Liability for Recognized Revenue. Note you can also review the Balance Sheet formula by clicking once on the Driver row or edit by double-clicking on the row.
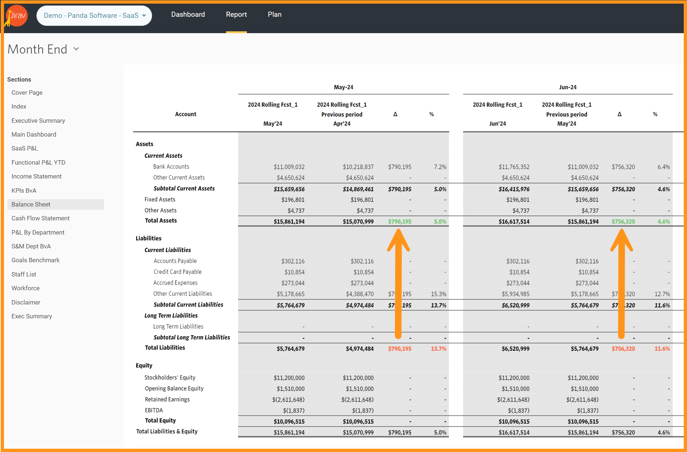
Here is the Report of the Balance Sheet as well - you can see cash goes up by the amount of the billed Revenue since the Liabilities increase results in an increase in Cash in the financial model.
Go to Reports and navigate to a Balance Sheet report.
The example I have below has been set up in a manner to show that the Cash changes based on the deferred changing; you will see cash variance is based on the change in the Deferred Revenue balance.
The last area to look at is the Revenue that is recognized and that is much more straightforward - the revenue has been booked directly and can be seen in the report below:

This Revenue will then flow through to Net Income which closes out to Retained Earnings thus offsetting the balance sheet deferred revenue that has been recognized - Jirav does all the heavy lifting for you and the three-way financials tie out for you.