A plan in Jirav represents a specific scenario for planning. Utilize plans to create budgets approved by the board, as well as run different scenarios that consider factors such as future funding, conservative or aggressive performance estimates, and time-boxed run rates.
This article includes an overview of the following areas related to Plan Management:
- Manage Plans Overview
- Active and Archived Plans
- Adding and Deleting Plans
- Plan of Record (PoR) Designation
- Automatic Roll Forward
- Actuals & Forecast Period and Other Settings
Manage Plans Overview
To review your plans, navigate to the Plan section and select the chevron to the right of the currently selected active plan to open the context menu and select "Manage Plans."

Active & Archived Plans
Plans are organized into two sections: Active and Archived
- Active Plans can be viewed in the dashboard, report, and plan areas.
- Archived Plans are not visible in the dashboard, report, and plan area. However, archived plans can be restored to an active plan as needed.
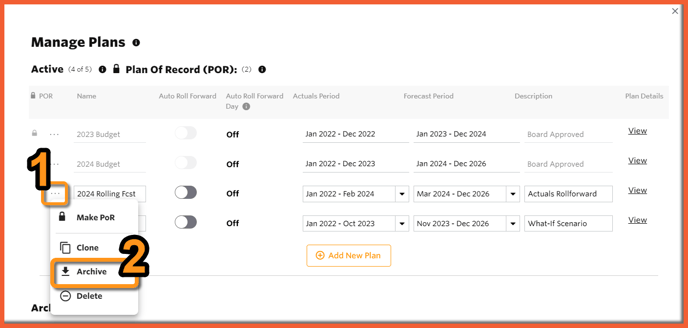
To move a plan between Active and Archived, click on the ellipsis located to the left of the plan in the Manage Plans screen and choose either "Archive" or "Make Active".
Adding and Deleting Plans
New Plans
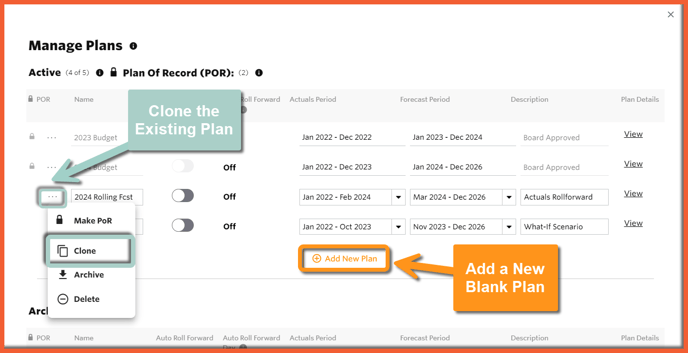
There are two options for creating a new plan: Clone or Blank
-
- Cloned Plans are an exact replica of an existing plan at a specific point in time. Once created, the cloned plan becomes independent from the original plan, meaning any changes made to the original plan will not affect the cloned plan.
- Blank Plans do not include any data input in plan periods or plan drivers. However, global drivers and system settings for plans (cash, salaries, AR & AP) still apply.
To create a new plan, navigate to the Manage Plans screen then either clone a plan by clicking on the ellipsis located to the left of the plan to be copied and select "Clone" or choose "+ Add New Plan" to add a blank plan.
Helpful Hints:
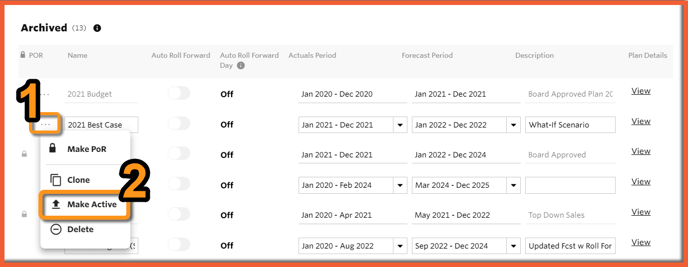
- When you clone a plan, it is automatically created as an archived plan. To make the cloned plan active, simply click on the ellipsis located to the left of the plan and select "Make Active".
- If you are unable to make an archived plan active, check that you have not reached your maximum number of active plans. If the maximum has been reached, you must archive one of your active plans before you can make an archived plan active.

- Clone your current active plan before making significant changes. This creates a clone in the archived folder. Because archived plans are not calculated in memory until they are moved to active, this action creates a backup of the plan before any changes are made, and you can quickly get back to planning in the active plan.
Delete Plans
To delete a plan, click on the ellipsis located to the left of the plan and select "Delete".
Helpful Hint:
Deleting a plan is a permanent action and cannot be undone. Instead of deleting a plan, it is recommended to archive the plan for a period of time so that it can be restored if needed in the future.
Plan of Record Designation
A Plan of Record (PoR) is a locked plan that is indicated by a 🔒 icon in the Manage Plans screen. The following are characteristics of PoRs:
- A PoR is read-only and cannot be edited.
- The PoR will maintain its structure as of when it was designated as a PoR. For instance, if there are any changes made to the chart of accounts, the chart of accounts in the PoR will still reflect the previous version.
- The PoR will maintain the staff list as of when it was designated as a PoR.
- It is possible to have multiple PoRs. PoRs follow the same rules as active and archived plans, meaning an active PoR can be viewed in the Report, Dashboard, and Plan area, while an archived PoR cannot be.
- Once a plan has been designated as a PoR, it cannot be reversed. However, a PoR can be cloned into an editable plan. The cloned version of the PoR will capture any modifications made in the Setup area after the PoR designation. This includes updates to the imported staff list, changes to the chart of accounts or department structures, and corrections to accounting and custom actuals. For example, once you finalize your Annual Operating Plan or Board Approved Budget, you could make that Plan a PoR. Then, when someone asks you a "what if" or you are ready to re-forecast based on Q1 Actuals, you can simply clone the PoR, make the desired updates, and run a report to compare the updated plan to that of the original PoR.
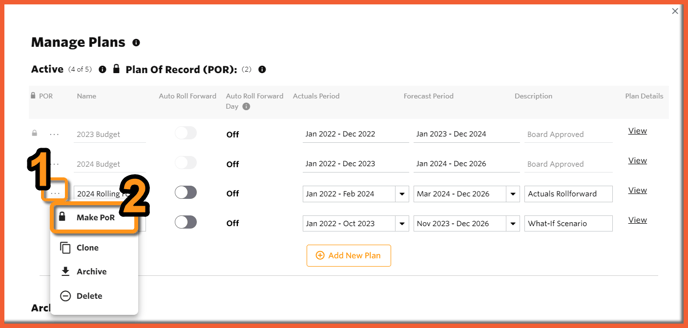
To designate a plan as a Plan of Record (PoR) a plan a POR, click on the ellipsis located to the left of the plan and select "Make PoR".

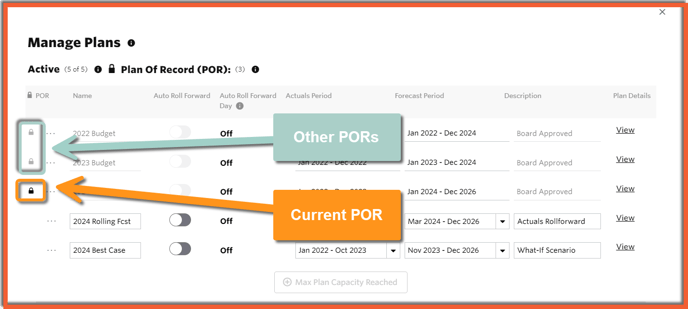
You can configure Reports & Dashboards to refer to the "Current PoR". If you have multiple plans designated as PoRs, the current PoR will be indicated with a black lock icon, while the others will be gray. To change the designation of the current PoR from one plan to another, simply click on the ellipsis next to the desired plan and select "Make PoR" again.
Plan of Record FAQs
Can I have more than one PoR?
Yes, it is possible to have multiple PoRs. All PoRs are designated with a lock (🔒) before the name of the plan. The current PoR will be indicated with a black lock icon, while the others will be gray.
I marked my Plan a POR before it was finalized, can I undo the POR designation?
No. Once a plan has been designated as a PoR, it cannot be reversed. However, a PoR can be cloned into an editable plan. The cloned version of the PoR will capture any modifications made in the Setup area after the PoR designation. This includes updates to the imported staff list, changes to the chart of accounts or department structures, and corrections to accounting and custom actuals.
If I have more than one PoR, how do I know which PoR my Dashboard is referencing?
To ensure that your dashboards reference the current Plan of Record (PoR), select the ellipsis
(. . . ) next to the desired plan and choose "Make PoR" again. The PoR designated with the filled-in black lock icon will be considered the current PoR.
Are there any instances where a PoR can change?
Yes, there are some structural updates that will have an impact on PoR reporting. The PoR will maintain its structure as of when it was designated as a PoR. For instance, if there are any changes made to the chart of accounts, the chart of accounts in the PoR will still reflect the previous version. As such a report comparing the PoR to a plan with the new structure would not make sense.
Before deleting accounts or departments in Setup, send an email to support@jirav.com to ensure the update does not negatively impact your ability to report on the PoR.
Can I edit a PoR?
A PoR is read-only and cannot be edited.
What Staff List will the PoR have?
The PoR will maintain the staff list as of when it was designated as a PoR.
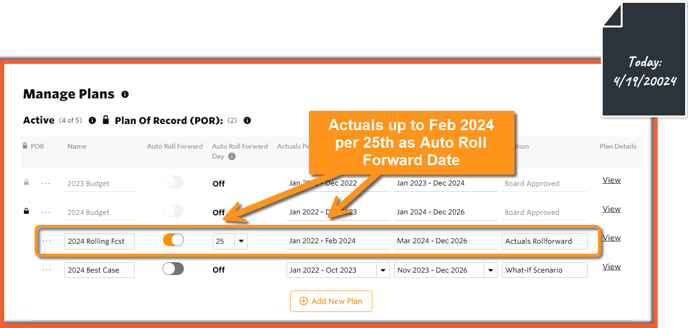
Automatic Roll Forward
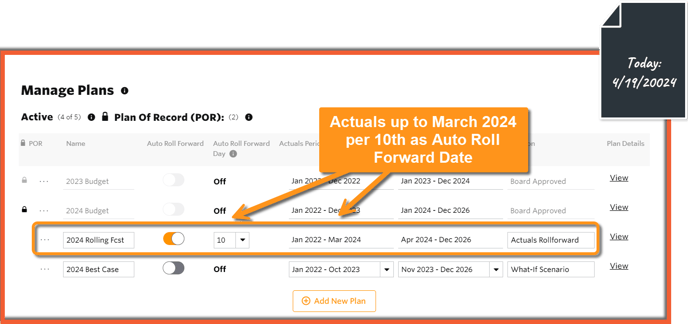
Enable Plans to roll forward automatically to include an additional month of actuals - enable the setting from Plans > Manage Plans.
Enabling Auto Roll Forward with a date that has not yet been landed on will put the actuals period 2 months back (Ie, Today is April 1st, if the user selected “2” or higher for the Auto Roll Forward date, the Actuals period is set to end in February).
When the date is landed on, the Actuals period lands on the most recently completed month (IE, Today is April 1st, if the user selected “1”, the Actuals period would be set to end in March).
Actuals & Forecast Period and Other Settings
Name
The "Name" field is a free text field that you can use to give a label to your plan. This label will be visible in dashboards, reports, and plans.
Description
The "Description" field is a free text field that you can use to add internal notes about the plan. This label is only visible in the Manage Plans area.
Plan Details
The "Plan Details" are automatically generated system information including the date the plan was created, the last date content was modified in the plan, the last date plan settings were modified, and the date it was designated as a Plan of Record (PoR) if applicable.
Actuals Period & Forecast Period
The "Actuals Period & Forecast Period" determines which months will display historical financial data from the accounting system and which months will be planned for within Jirav for the given plan.
The following are characteristics of the Actuals & Forecast Periods for a Plan:
- The Actuals Period determines which historical accounting data will be visible in the given plan.
- Data in Actuals Periods is read-only and is displayed in plan tables with white headers.
- The Forecast Period determines which periods you will plan for in the future.
- Data in Forecast Periods is editable and is displayed in plan tables with blue headers.

Helpful Hints:
- The Cutover Date referenced in Drivers is a dynamic reference to the first month of the Forecast Period for the given Plan.
- Updating the end of the Actuals Period will automatically update the start of the Forecast Period. Similarly, updating the start of the Forecast Period will automatically update the end of the Actuals Period.
- The Plan overlays Actuals, which means that the Actuals data is still stored in Jirav even if it is not displayed in the given plan.