The system-wide settings for Accounts Receivable (A/R) and Accounts Payable (A/P) forecasting, along with the Auto-Forecast feature, apply to all plans within a given Jirav account. These settings affect every plan in the account, except for those designated as a Plan of Record (POR), which will remain unchanged. By configuring these settings, you define how A/R and A/P are projected, as well as how Auto-Forecast generates future projections based on historical data.
A/R and A/P Forecast
Configure forecasting methods for Accounts Receivable (A/R) and Accounts Payable (A/P) to project future cash flows based on historical data and assumptions. A/R forecasting estimates how quickly you expect to collect on sales, while A/P forecasting projects the average time it takes to pay bills.
To configure the A/R & A/P settings, go to Settings ⚙️ > Forecast.
A/R Forecasting Methods:
-
Option 1: None
No system-wide methodology is applied. A/R can be planned using balance sheet plan drivers and data input as needed. Learn more about using balance sheet plan drivers for AR here. -
Option 2: Delayed Days for Collection
Assumes a collection delay on revenue. For example, selecting a Net 30 A/R Delay means revenue planned for a particular month will be collected one month later.The setting also has an impact on how the A/R Balance as of the last month of Actuals is collected.Once this A/R Forecasting method is chosen, the system will prompt you to select the desired A/R account for forecasting and the corresponding A/R delay.
⚠️ Note: Bank (cash) accounts cannot be selected for forecasting A/R.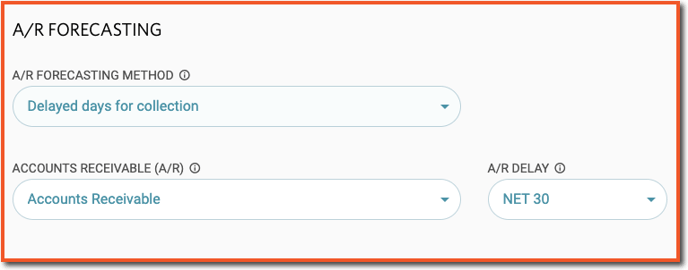
An Example: Let's say your monthly revenue forecast is $200,000 in June, $250,000 in July, and zero for the rest of the year. The accounts receivable balance was $630,235 as of the last month of actuals, May. This scenario will help illustrate how each forecasting option operates.- Accounts Receivable: A/R Delay Net 0
-
- AR Increases in all months by Current Month's Planned Revenue
- AR Decreases in all months by Current Month's Planned Revenue
- AR Decreases in the first month of the forecast by the Balance of AR as of the Last Month of Actuals

- Accounts Receivable: A/R Delay Net 30
-
-
- AR Increases in all months by Current Month's Planned Revenue
- AR Decreases in all months by Previous Month's Planned Revenue
- AR Decreases in the first month of the forecast by the Balance of AR as of the Last Month of Actuals

- Accounts Receivable: A/R Delay Net 60
-
- AR Increases in all months by Current Month's Planned Revenue
- AR Decreases in all months by Planned Revenue from 2 Month's Prior
- AR decreases in both the first and second month of the forecast by evenly dividing the Balance of AR as of the Last Month of Actuals between the two months

-
-
Option 3: Trended Percent of Revenue
Once this A/R Forecasting method is chosen, the system will prompt you to select the desired A/R account for forecasting and the corresponding trailing months.
Calculates A/R as a percentage of forecasted revenue based on historical data. The system takes the average of past months' A/R as a percentage of revenue and applies that to the current forecasted revenue.
⚠️ Note: Bank (cash) accounts cannot be selected for forecasting A/R.  The calculation for A/R as a percentage of Revenue is the balance of all accounts marked as Accounts Receivable divided by total Revenue. The accounts marked as Accounts Receivable are labeled with a proceeding (A/R) in the Chart of Accounts (COA). Tag or untag accounts as Accounts Receivable by selecting the ellipsis (. . .) to the left of the account name.
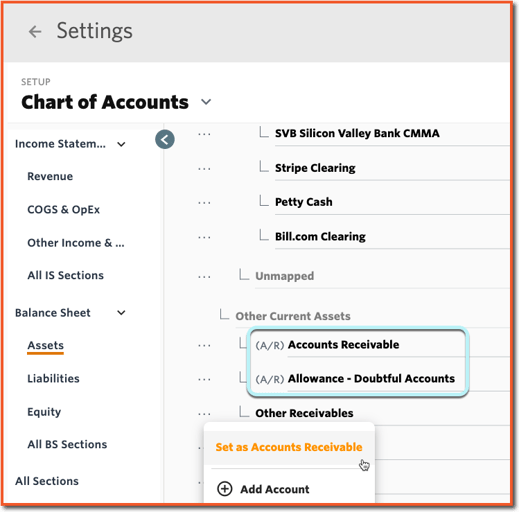
⚠️Note: It’s recommended to use the Trended Percent of Revenue A/R Forecasting method only when Revenue is also forecasted based on a trend. This is because if revenue is not trended, it may lead to mismatched projections, causing A/R values to be inaccurate or inconsistent with your overall revenue forecast.
A/P Forecasting Methods:
-
Option 1: None
No system-wide methodology is applied. A/P can be planned using balance sheet plan drivers and data input as needed. -
Option 2: Delayed Days for Collection
Once this A/P Forecasting method is chosen, the system will prompt you to select the desired A/P account for forecasting, the corresponding A/P delay, and the expense accounts that are typically paid through A/P. This is typically all COGS & OpEx accounts less salary-related accounts, depreciation, and any other non-cash expenses.
Assumes a payment delay on expenses. For example, selecting a Net 30 A/P Delay means expenses planned for a particular month will be paid one month later. The setting also has an impact on how the A/P Balance as of the last month of Actuals is collected.
⚠️Note: The accounts that are available to select as A/P Accrual Accounts will be all of the expense accounts in your account from the COGS, OpEx, and Other Expense sections of the COA. 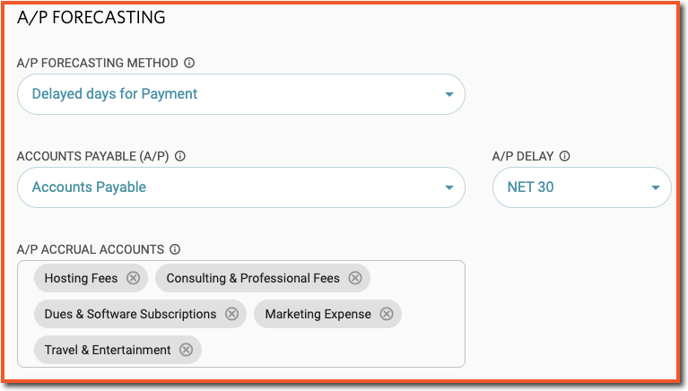
The calculation for A/P will be as follows based on the A/P Delay selected:
-
Net 0 (Pay immediately)
-
In the first month of the plan:
A/P = Prior Month A/P Balance – Last Month’s Actual A/P Balance -
In all months:
A/P = Current Month Expenses – Expenses from A/P Accrual Accounts in the same month
Net 30 (Pay next month)
-
In the first month of the plan:
A/P = Prior Month A/P Balance – Last Month’s Actual A/P Balance -
In all months:
A/P = Current Month Expenses – Prior Month’s Expenses from A/P Accrual Accounts
Net 60 (Pay in two months)
-
In the first month of the plan:
A/P = Prior Month A/P Balance – 50% of Last Month’s Actual A/P Balance -
In the second month of the plan:
A/P = A/P – 50% of Last Month’s Actual A/P Balance -
In all other months:
A/P = Current Month Expenses – Expenses from two months ago in the A/P Accrual Accounts
-
-
-
Option 3: Trended Percent of OpEx
Calculates A/P as a percentage of forecasted operating expenses based on historical data. The system takes the average of past months' A/P as a percentage of OpEx and applies that to the current forecasted OpEx.Once this A/P Forecasting method is chosen, the system will prompt you to select the desired A/P account for forecasting and the corresponding trailing months.
 The calculation for A/P as a percentage of OpEx is the balance of all accounts marked as Accounts Payable divided by total OpEx. The accounts marked as Accounts Payable are labeled with a proceeding (A/P) in the Chart of Accounts (COA). Tag or untag accounts as Accounts Payable by selecting the ellipsis (. . .) to the left of the account name.
⚠️Note: It’s recommended to use the Trended Percent of OpEx A/P Forecasting method only when Expenses are also forecasted based on a trend. This is because if revenue is not trended, it may lead to mismatched projections, causing A/P values to be inaccurate or inconsistent with your overall expense forecast.
Auto-Forecast
Auto-Forecast is a powerful feature in Jirav that uses historical data and system-generated trends to project future values. While Auto-Forecast must be enabled at the plan level (via the right-hand menu in the Plans section), the configuration options in Settings (⚙️) > Forecast > Auto-Forecast.

⚠️Note: Changes to settings in this screen apply across all plans in the account where Auto-Forecast is enabled.
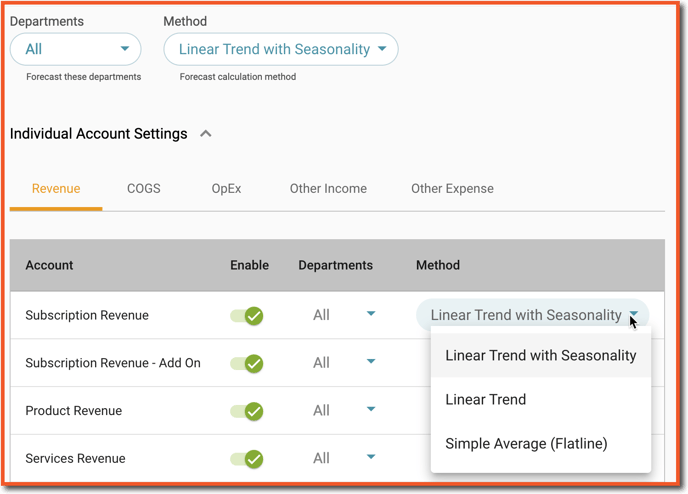
Within the Auto-Forecast settings screen, you'll choose between two configuration modes: Automatic or Custom.
 Automatic Mode (Default Behavior)
When Auto-Forecast is enabled and Automatic mode is selected, the following rules apply:
-
Forecasts are calculated at the first child account level for all Income Statement accounts across all departments.
-
System salaries are excluded, even if staffing data exists, to prevent double-counting when salaries are also included in OpEx.
-
A linear trend with seasonality is used if enough historical data is available.
-
If data is too sparse, the system automatically applies the next best method, such as a linear trend without seasonality or a simple average.
-
Custom Mode (Advanced Settings)
Switching to Custom mode in Settings (⚙️) > Forecast > Auto-Forecast unlocks more control over how Auto-Forecast is applied across the account. With this mode, you can:
-
Set specific forecasting methods by account.
-
Exclude certain accounts from Auto-Forecast so you can use a driver or manual planning instead.
-
Apply Auto-Forecast at a more granular level than the first child account.