
Import your accounting actuals from QuickBooks Desktop via the QuickBooks Web Connector (QBWC) to begin planning and reporting in Jirav
Jirav's foundation is built on your accounting data. The QuickBooks Desktop integration utilizes the QuickBooks Web Connector powered by Intuit. The QuickBooks Web Connector must be set up prior to establishing the connection in Jirav.
Article Contents
- Initial Connection Instructions
- Import Instructions
- QuickBooks Desktop Requirements
- Frequently Asked Questions
Initial Connection Instructions
The QuickBooks Desktop integration with Jirav enables seamless import of essential data such as the chart of accounts, account balances, and optionally, the department structure. This connection is facilitated through the QuickBooks Web Connector (QBWC). Follow these steps to set up the integration and start importing data:
- Download the QWC File
- Log in to Jirav, navigate to Settings ⚙️ > Integrations > Find the Intuit QuickBooks Desktop tile and click CONNECT.

-
Click QWC Configuration File to download the file.

-
Generate a password by clicking Generate Password. Copy the password and store it securely, as it will be required later in the process.

- Helpful Hint: If you're using Remote Desktop to access QuickBooks Desktop, you can right-click and copy the .qwc file from your computer and then paste it onto the Remote Desktop.
- Log in to Jirav, navigate to Settings ⚙️ > Integrations > Find the Intuit QuickBooks Desktop tile and click CONNECT.
-
Launch QBWC and Add the Jirav Application
- Open QuickBooks Desktop and ensure the correct company file is open.
- Navigate to File > App Management > Update Web Services.

- Click Add Application and select the QWC file you downloaded in Step 1.
- Helpful Hint: If you're using Remote Desktop to access QuickBooks Desktop, you can right-click and copy the .qwc file from your computer and then paste it onto the Remote Desktop.
-
Authorize Jirav in QuickBooks Desktop
-
Follow the prompts to authorize Jirav to access the QuickBooks data.
- Approve Jirav Web Service access to accounting data. It is recommended to:
- Allow access even if QuickBooks is not running.
- Select Admin in the "Login as" dropdown list (or another user with appropriate permissions). Note: If this user is deleted later, the connection will break.

-
- Sync QuickBooks Web Connector with QuickBooks Desktop
- Open the QuickBooks Web Connector.
- Locate the Jirav Web Service in the list (e.g., "Jirav - [Your Account Name]").
- Paste the password you copied earlier in Step 1 into the Password field. Save the password when prompted.
- Uncheck Auto-Run.
- Select the checkbox next to the Jirav Web Service and click Update Selected to initiate the sync and verify the connection.

- Under Status, look for a success message next to Last Result that says "Established connection with Jirav".
- Verify the Connection in Jirav
-
Return to Jirav, check the required checkbox and click Check Connection.
-
Ensure the connection is successful before proceeding to import data from QuickBooks Desktop into Jirav.

-
- Import Data to Jirav
- Now that the connection has been established, follow the Import from QBD instructions in this article.
Import from QBD
After you have set up the initial connection, follow these steps to import Actuals from QBD to Jirav:
- Login to Jirav, navigate to Integrations, click Import and select a date range for your import.

- Open QuickBooks Web Connector.
.
- Find the Jirav application in the list.
- Click "Update Selected."

- Go back to Jirav and verify the import completed successfully.


- Explore dashboards, reports & plans to interact with the data.
QuickBooks Desktop Requirements
Failure to meet these requirements may result in errors during the integration process.
- Supported QuickBooks Versions
Jirav supports QuickBooks Desktop Pro & Premier (2015 and later) and Enterprise (15.0 and later). - Initial Connection Access Requirements
- You must be logged into QuickBooks as an admin user.
- QuickBooks must be in single-user mode during the integration process.
- Only one company file should be open at a time.
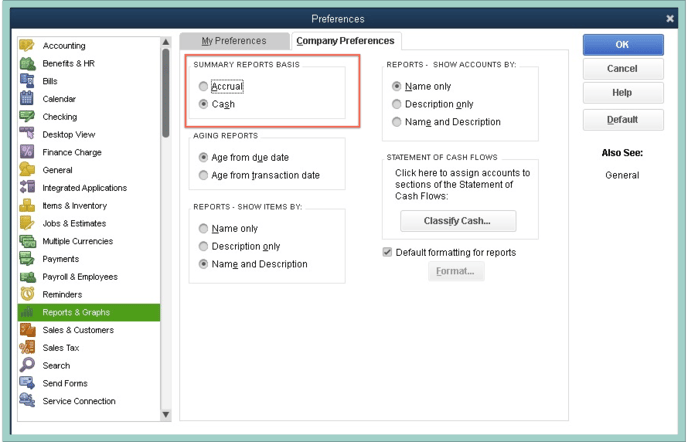
- Cash vs Accrual Basis Compatibility
- The integration supports either Cash Basis or Accrual Basis reporting.
- Confirm your reporting basis is set correctly in QuickBooks under Preferences > Reports & Graphs > Company Preferences.
- Match the setting in Jirav by navigating to Settings > Company > Accounting.

FAQs
- Question: Does QBD need to be open in order to import data to Jirav?
Yes, QBD needs to be open to import to Jirav via the QuickBooks WebConnector. - Question: Can multiple users at my firm connect to and import actuals from the same QuickBooks Desktop file?
Yes, Jirav supports multiple users connecting to the same QuickBooks Desktop file through a custom QuickBooks Web Connector (QBWC) setup. Please contact our support team for guidance. - Question: I used to use Autofy to import my QuickBooks Desktop actuals into Jirav, but it’s no longer working. What happened, and how do I fix this?
Autofy has been discontinued and is no longer supported. To continue importing your QuickBooks Desktop actuals into Jirav, you’ll need to switch to the QuickBooks Web Connector (QBWC) following the Initial Connection Instructions in this article. The QBWC is our new integration tool, designed to eliminate the errors commonly experienced with Autofy and provide a smoother experience.Your previously imported actuals from Autofy are still available in Jirav, but you’ll need to set up the QBWC to import new data. - Question: How can the .qwc file be used when accessing QuickBooks Desktop via Remote Desktop?
If QuickBooks Desktop is accessed through Remote Desktop, the .qwc file can be transferred by right-clicking it on the local computer, copying it, and then pasting it onto the Remote Desktop. This ensures the file is available for setting up the QuickBooks Web Connector. - Question: Can I use the same QuickBooks Web Connector (QBWC) to connect to multiple QuickBooks Desktop files in Jirav?
Yes, the same QBWC can be used to connect multiple QuickBooks Desktop (QBD) files to different Jirav instances. Each connected QBD file will appear as its own "Application" within the QBWC. Here are some tips for a smooth setup:- Open the Correct File: Ensure that only the relevant QBD company file is open when creating the connection.
- Keep QBWC Open: The QBWC must remain open during data imports from QBD to Jirav.
- Save Passwords: Save the password for each "Application" in QBWC to allow for future imports.
Need additional assistance?
We're here to help! Please reference our QuickBooks Desktop troubleshooting article or submit a support ticket.