The Jirav Partner Portal is a platform that allows our partners to manage their business and review the status of their clients' accounts within Jirav. It provides a bird's eye view of your Jirav accounts and offers tools to assist in managing your practice.
As a partner, you can efficiently manage accounts by creating, cloning, upgrading, and deleting them as necessary. Additionally, the Partner Portal offers robust user management functionalities, such as assigning, removing, and inviting users with different access levels. Partners can also maintain brand consistency by customizing logos and branding features.
Article Contents
Partner Portal Access
There are two ways to access your partner portal: either navigate to it from the Jirav login screen or select it from the company dropdown picker within a Jirav account.
- From the Login screen: Select "Go to Partner Portal" after authenticating your credentials

- From Within a Jirav Account: Open the company dropdown picker within any Jirav Account and select "Go to partner portal".

Helpful Hints:
- It is recommended to assign one person at your firm to be the partner portal user. This person will have access to manage client accounts across the firm. Additional users can be assigned on a by account basis.
- If the partner portal options are not visible when you log into Jirav, it indicates that you are not designated as a partner portal user. To gain access, reach out to the current partner portal user within your firm for assistance.
Account Types
Each Jirav account you create for your customers has an associated account type that determines the level of reporting, dashboarding, and planning capabilities, as well as the forecasting horizon available to users. The available options are:
- Controller Essentials: Provides historical financials and workforce analytics, KPIs, budget vs. actual analysis, and forward-looking AI forecasts. Available at the company level.
- Controller Essentials w/Depts: Provides historical financials and workforce analytics, KPIs, budget vs. actual analysis, and forward-looking AI forecasts. Available at both the company and departmental levels.
- CFO Enterprise: Provides standard or custom budgets, long-range forecasts, workforce planning & bottoms-up scenario modeling. Available at the company level.
- CFO Enterprise w/Depts: Provides standard or custom budgets, long-range forecasts, workforce planning & bottoms-up scenario modeling. Available at both the company and departmental levels.
Click this link to learn more about the differences between each account type.
Client Account Management
Within the Jirav Partner Portal, every account is usually linked to a particular company or client. As a partner, you have the ability to efficiently oversee these accounts by examining important details and performing tasks such as creating, cloning, upgrading, and deleting them as needed.

Review Accounts
Each account within the Partner Portal will have the following details available:
- Name: The identifying label of the client account within the partner portal, the company dropdown picker, and the Jirav account.
- Short Name: A shortened version of the account name that is used for URLs and links.
- Plan: The subscription level or type of account the client is subscribed to within Jirav.
- Type: the client account designation (Client Account, Firm Account, or Internal), which is passed on to HubSpot for billing purposes.
- Admin: Individuals with the Admin Role within the client account.
- Users: The overall number of users granted access to the client account for all roles, excluding the Partner Super Admin who originally created the client account.
- Depts: The count of distinct departments set up within the client account.
- Accounting: The accounting system used within the client account.
- Data Through: The date up to which GL Actual data from the Accounting system has been imported to the client account.
- Close Month: The designated month for financial reporting and accounting closure within the client account.
- Workforce Through: The Start Date of the most recent Actual hire imported to the client account.
- Custom Through: The date up to which Custom Actual data has been imported to the client account.
- Created: The date when the client account was created within the Partner Portal.
- Notes: A free-form text field to add additional comments or remarks relevant to the client account for your reference.
Helpful Hints:
- The default setting for newly provisioned client Jirav accounts is "Client Account," which is billable.
- If you would like to change the account type to "Firm Account" or "Internal" (such as Templates or Demo), please contact support at support@jirav.com or submit a Support Ticket here. Both "Firm Account" and "Internal" account types are non-billable.
Create Accounts
There are two options for creating a new account in Parter Portal: Create Account or Clone Account. Choosing to create a new account allows for setting up a fresh instance tailored to specific needs, while cloning an account duplicates an existing setup, ideal for maintaining standardized templates or replicating successful models.
Create Account
To add a new account, follow these steps:
(1) Access the Partner Portal: Log in to the Partner Portal and select "Create Account".
(2) Create Account: Choose the appropriate type of Jirav account for the company from the options provided:
Standard

(3) Input Company Details: Ensure that the names match the customer you are onboarding in Jirav.

Company Name
This name will appear in reports and when logged in to the application.
The Company Name can be changed later from Settings⚙️ > Company within the given Jirav account.
Short Name
The short name is what will show up in the URL of the browser and in any links shared from the application. It's important to note that once set, this field cannot be changed later. When choosing a short name, make sure to follow these guidelines:
- Only includes letters (a-z), numbers(0-9), hyphens( -) and underscores( _)
- Consecutive hyphens are not allowed
- Minimum length is 4 characters
- Maximum length is 20 characters

(4) Create the Account: Click the Create button after inputting the Company Details. You will be automatically be added as an Admin in the new account. Allow up to five minutes for the new account to appear in your company dropdown.
Congratulations! You have successfully set up your new Jirav account and are ready to proceed to the next step of connecting your client's data.
Clone Account
To create a a new account by cloning an existing account, follow these steps:
(1) Access the Partner Portal: Log in and navigate to the account you wish to clone.
(2) Initiate Cloning Process: Click on the ellipsis (. . .) to the left of the account you wish to clone and select Clone Company from the menu.
(3) Input Company Details: Ensure that the names match the customer you are onboarding in Jirav.
Company Name
This name will appear in reports and when logged in to the application.
The Company Name can be changed later from Settings ⚙️ > Company within the given Jirav account.
Short Name
The short name is what will show up in the URL of the browser and in any links shared from the application. It's important to note that once set, this field cannot be changed later. When choosing a short name, make sure to follow these guidelines:
- Only includes letters (a-z), numbers(0-9), hyphens( -) and underscores( _)
- Consecutive hyphens are not allowed
- Minimum length is 4 characters
- Maximum length is 20 characters
(4) Clone the Account: Click "Clone" to initiate the process then "Confirm & Clone". Allow up to five minutes for the new account to appear in your company dropdown.
Congratulations! You have successfully set up your new cloned Jirav account and are ready to proceed to the next step of connecting your client's data.Helpful Hints:
When cloning an account in Jirav, the new account will replicate these components from the original account:
- Dashboards
- Report Package Templates
- Custom Tables
- Global Drivers
- Active Plans
- Master COA
- Master Departments
However, please note that the following elements will not be copied over:
- Published Reports
- Archived Plans
- Plans of Record
- Actuals
- Users
- Sharing Settings
- Goals
Remember, the account can only be cloned to the same type of account; for instance, a Controller Essentials account can only be cloned in to another Controller Essentials account. Once cloned, the account can however be upgraded to a higher type of account as needed.


Upgrade Accounts
To upgrade an existing account's capabilities, follow these steps:
(1) Access the Partner Portal: Log in and navigate to the account you wish to upgrade.(2) Initiate Upgrade Process: Click on the ellipsis (. . .) to the left of the account you wish to upgrade and select "Upgrade" from the menu.

(3) Complete the Upgrade: Select the plan to upgrade to from the available options and then select "Confirm". Allow up to five minutes for the account to upgrade.

Be Aware:
- It is not possible to downgrade an account.
- The current account type determines what options are available for upgrade, e.g., a Controller Essentials account can be upgraded to Controller Essentials with Departments, CFO Enterprise, or CFO Enterprise with Departments, whereas a CFO Enterprise can only be upgraded to CFO Enterprise with Departments.
If you have accounts in your Partner Portal that are no longer needed, you can remove them following these steps:
- Access the Partner Portal: Log in and navigate to the account(s) you'd like to delete.
- Select Accounts for Deletion: Choose individual or multiple accounts you want to delete using the checkbox to the left of the account.
- Delete Accounts: Once selected, click on the "Delete Account(s)" button.

- Confirm Deletion: Confirm the deletion when prompted. Allow up to five minutes for the account to delete.

Did you know?
Deleted accounts will be moved to the "Deleted Accounts" section of your Partner Portal for 30 days. Within 30 days, you can restore deleted accounts if needed. After this period, accounts will be permanently deleted, or you can choose to "Delete Forever".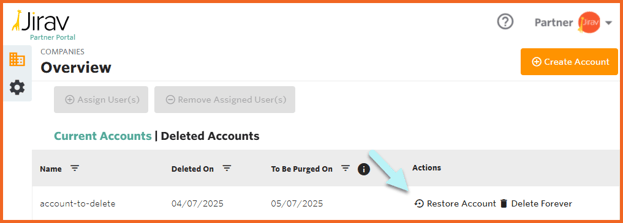
User Management
Jirav Firm Users vs. Partner Portal Users vs. Jirav Client Users
There are three main types of users: Jirav Firm Users, Partner Portal Users, and Jirav Client Users. It's crucial to grasp the distinctions between these user types, their associated access levels, and the rules governing their usage.
- Jirav Firm Users: Firm users are individuals within your firm who have access to specific Jirav accounts managed by your firm. Their permissions are configured within the individual Jirav accounts and can range from Basic to Admin roles.
- Partner Portal Users: These users have access to the Partner Portal interface and can oversee the creation and deletion of Jirav accounts within the Partner Portal. They can also manage existing Jirav firm users within the Jirav accounts.
- Jirav Client Users: Client users are individuals with restricted access to a single Jirav account managed by your firm. Similar to Jirav firm users, their permissions are set within individual Jirav accounts and can range from Basic to Admin roles, depending on the configurations within each client account.
Jirav Firm Users
A Jirav firm user has access to one or more Jirav accounts that has been created in your partner portal for your clients. They can log in to the Jirav account and manage it on behalf of the client.
Managing Jirav Firm Users in Accounts:
To add a team member from your firm to an account, follow these steps, depending on the use case:
Scenario 1: Adding a New Team Member
In this scenario, the user is new and does not have access to any existing account within your partner portal. The new team member must be added directly to the first account (and NOT from the partner portal). Please note you must be a Jirav Firm User with an Admin role in the client account to perform these actions.
- Access an account by logging in to the desired Jirav account or click on the short-name for their account from your partner portal.
- Navigate to Setup ⚙️> Users within the account.
- Add the new firm user with the appropriate Role and Invite. Click here to learn more about user management in accounts.
Scenario 2: Adding or Removing a Team Member from Multiple Accounts
In this scenario, the user change can be managed from partner portal. Please note you must be a Partner Portal User to perform these actions.
- From Partner Portal, check the box(es) to the left of the account name and click + Assign User(s) or ➖ Remove Assigned User(s).
- Select the desired users from the list and Assign or Remove. This will add the user to the account(s) with the Editor role or remove them as users from the account(s).
- When adding or removing users to accounts from the partner portal, only those users with the same domain as your firm, who already have access to at least one account in your portal, and who have previously logged into Jirav will appear in the dropdown menu. This ensures that only authorized and actively involved users can be added to accounts in bulk.
Helpful Hints:
- If the user you wish to add is not populating in the list from Step 2, refer to the steps for scenario 1.
-
There are a few requirements that the user has to meet in order to appear within the drop-down menu to add or remove them from accounts in the partner portal:
- The user is required to have the same email domain as the partner portal domain. For example, if www.abccpafirm.com is your domain then the email must be something like employee@abccpafirm.com.
- The user must have previously established a user account in this partner portal. This means the user must have already been explicitly added to an account within your partner portal and previously logged into that account.
- A user who already has a profile linked to an account that is not within your partner portal does not satisfy this requirement. For instance, if the user signed up independently or was invited to an account by the Jirav sales team, they would not fulfill this requirement.
- If the user has already been added to the account, they will not appear in the Assign User(s) dropdown, but they will appear in the Remove User(s) dropdown.
- If you wish to change the user role from Editor to another role, log into the account by clicking on the short-name and navigating to Setup ⚙️> Users within the account.
Partner Portal Users
It is recommended to assign one person at your firm to be the Partner Portal User. This person will have access to manage client accounts across the firm. Additional users can be assigned access on a by-account basis as Jirav Firm users.
To Invite or Remove a Partner Portal User to your Partner Portal, follow these steps:
- From within the Partner Portal, navigate to Setup ⚙️.
- Locate the Users section and select 👤Invite User or 🗑️Remove User.
Note, these steps can only be completed by an existing Partner Portal User.

Helpful Hints:
- Adding a new partner portal user does not automatically grant entry to all accounts within your partner portal. Each Jirav account has its own set of user permissioning that is managed by individual account.
- A partner portal user cannot add themselves with the Admin role to an existing account that they did not create. They can add themselves with an Editor role.
- The creator of any new account created in Partner Portal will automatically have Admin role access in the newly created account.
-
When adding partner portal users, they must have the same domain as the firm domain associated with your partner portal. This means that users with email addresses that do not match the domain of your firm will not be able to be added via the partner portal.
For example, if your firm's domain is www.domain.com and you are attempting to add a partner user with an email address like John@notyourdomain.com, you will not be allowed to do so. This restriction ensures security and control over who has access to your partner portal. If you need to have multiple domains associated with your partner portal, submit a support ticket or email support@jirav.com for assistance.
Jirav Client Users
A client user's access is limited to the specific Jirav account linked to their company. Once logged in, they can only view the information you granted them access to.
To add a client to an account, follow these steps:
Please note you must be a Jirav Firm User with an Admin role in the client account to perform these actions.
- Access the client account by logging in to the desired Jirav account or if you have access to partner portal, click on the short-name for their account from your partner portal.
- Navigate to Setup ⚙️> Users within the account.
- Add the new firm user with the appropriate Role and Invite. Click here to learn more about user management in accounts.
Logo & Branding
When setting up your Jirav Partner Portal, you have the option to personalize it by white-labeling Jirav and adding your firm's logo to all Jirav accounts within your portal. This allows you to showcase your brand and create a cohesive experience for your clients.
To add your firm logo, navigate to Partner Portal > ⚙️Setup > Upload your logo.
Select Enable Branding to add your logo to all of the client accounts created in your portal.
The uploaded image can be set using a Square 1:1, Rectangle 16:9, Wide 5:1, or Freeform aspect ratio:

The Firm (Partner) Logo can be displayed under the Cover Page of the Client Account's Report Packages. Navigate to Reports > Package Settings > Show Partner Logo on the Cover Page:

Capacity
- Navigate to Setup from the gear icon on the left menu bar of the Portal.

- Scroll to the Capacity section to review the current capacity of accounts in your partner Portal.


Video Series
Discover a more interactive way to learn with our informative video series on the Partner Portal. Whether you prefer to watch them solo or with a group, these videos offer a classroom-style learning experience that can enhance your understanding of the Partner Portal
Introduction to Partner Portal Series
Overview of Partner Portal
Create Account
Clone Account
Upgrade Account
Delete Account
Assign Users
Remove Users
Invite Partner Portal Users
Logo and Branding
Importing Actual Data
Did you know?
You can earn a free CPE for this course on Earmark CPE. To receive the Earmark CPE credit, follow these steps:
- Access Jirav Partner Portal on the Earmark CPE app
- Click on the Enroll button
- Select the Course menu option for the following three parts:
- Learning Video - select mark complete to proceed to review questions
- Review Questions - answer three questions and review your feedback
- Assessment Quiz - answer five questions with a passing score of 70%. You can view feedback on your answers and retake the assessment quiz. Select the option Email CPE to receive your certificate of completion. Once completed, you can exit the course and return to any channel on Earmark CPE including the Jirav channel!
If you don't have the Earmark CPE app and you want to earn free CPE for participating in Jirav courses and other accounting podcasts, visit the Apple App Store or Google Play Store to download the Earmark CPE app.