Collaboration allows you to share a portion of a specific plan with another user for their review and/or input.
For example, you might want to invite the marketing lead to update the forecast for the marketing department spend or you might want to invite each department head to input their hiring plan for the upcoming budget year.
In addition to sharing a view and allowing editing, you can also directly assign tasks within the shared plan to users.
Plan share collaboration is unavailable in Controller Essentials. Please upgrade to CFO Enterprise to enable this feature.
Creating a New Plan Share
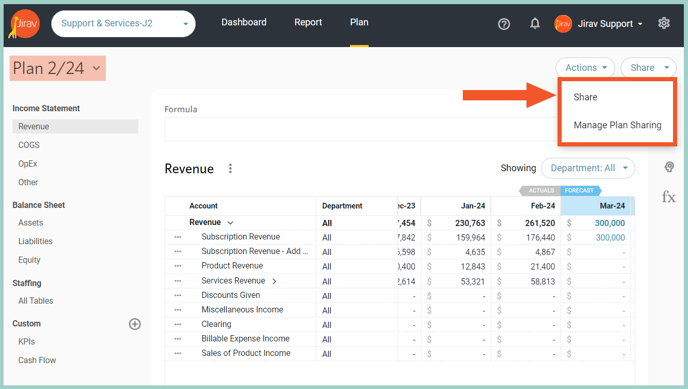
To share a portion of the Plan with another user, navigate to Plans, verify the desired Plan is selected, and choose "Share" in the upper right-hand corner.
Selecting Share will prompt you to complete the following 3 steps.
Step 1: Plan Access
Choose with whom the data should be shared with and what data should be shared.
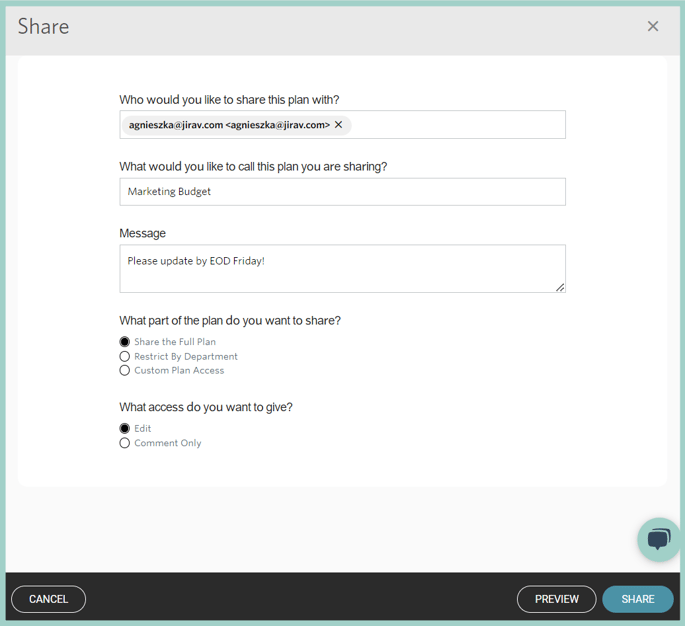
- Who would you like to share this plan with? Add one or more users
Did you know?
If the user you'd like to share with does not yet exist in Jirav, you can type in their email in the Share screen to add them as a user as part of the sharing process. New users added via the Share screen will be added with the Basic role.
- What would you like to call this plan you are sharing? This name will appear both in the administrator's Plan Management view and in the collaborator's view of Jirav.
- Message Optionally add a message to be included in the email sent to the collaborator.
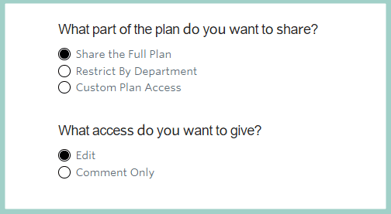
- What part of the plan do you want to share? Depending on what selection is made here, the additional customization available will adjust as described below.
- Share the Full Plan
- Grants the collaborator(s) access to everything within the selected Active Plan except the Drivers tab.
- Share the Full Plan
-
-
- When sharing the full plan you can also make a selection for What access do you want to give? of either Edit or Comment Only.
- When sharing the full plan you can also make a selection for What access do you want to give? of either Edit or Comment Only.
- Restrict by Department
- Grants the collaborator(s) access to everything within the selected active plan for the selected department(s) and all non-departmental data. Non-departmental data includes balance sheet tables, custom tables, and assumptions.
- When restricting by department, you can Select one or more departments to grant access to.
-
-
-
- When restricting by department, you can also make a selection for What access do you want to give? of either Edit or Comment Only.
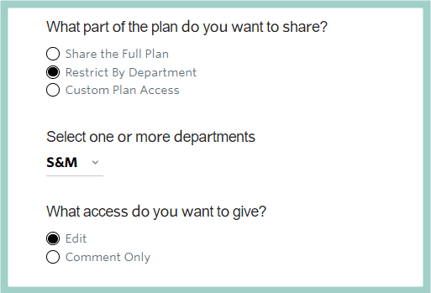
- When restricting by department, you can also make a selection for What access do you want to give? of either Edit or Comment Only.
-
-
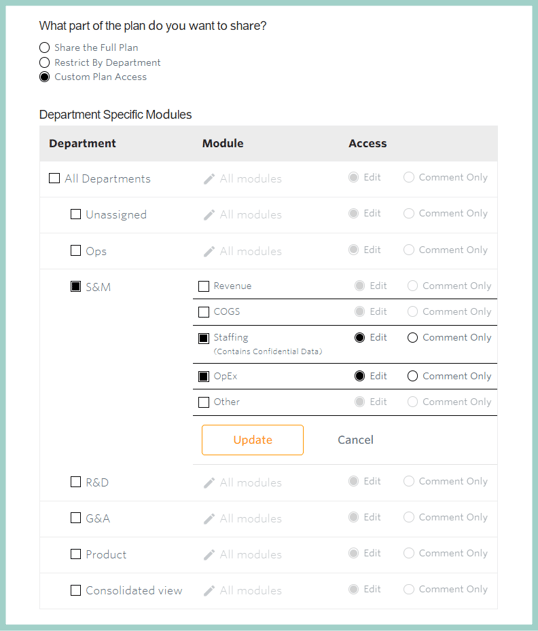
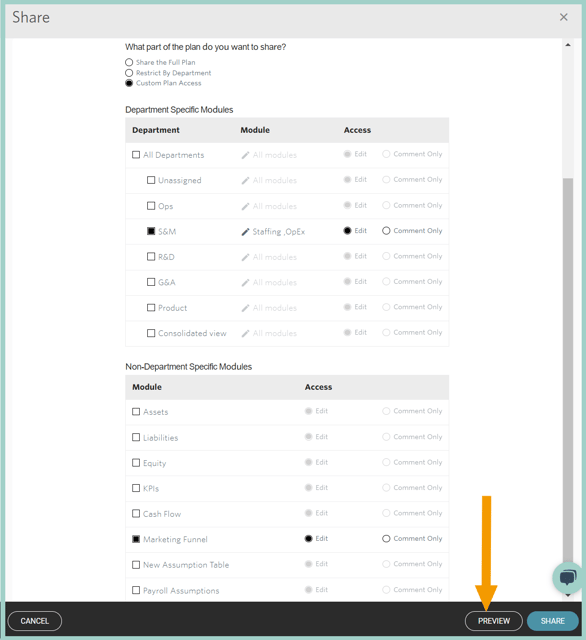
- Custom Plan Access
- Allows the administrator to grant access to collaborators at the most granular level.
- When granting custom plan access, you can select which Department Specific Modules the collaborator should have access to. This area consists of a checklist of Departments, allowing you to grant either Edit or Comment Only access to any or all Departments. For instance, you can grant comment-only rights on some Departments, edit rights on other Departments, and no access to others.
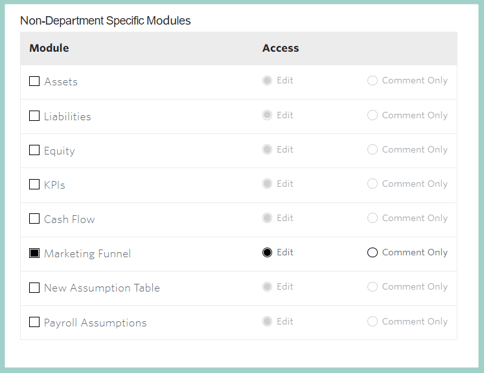
- When granting custom plan access, you can also select which Non-Department Specific Modules the collaborator should have access to. This area consists of a checklist of the balance sheet areas, specific Custom Tables, and Assumption Tables.
- Custom Plan Access
Once you adjusted the Sharing options, you can then select "Preview" to move on to Step 2 and view a preview of the Plan Share you have created or choose "Share" to immediately share the Plan (and skip steps 2 and 3).
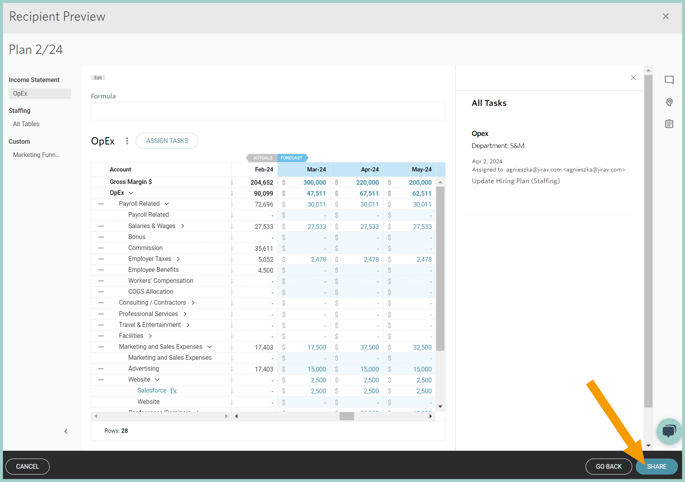
Step 2: Preview
The Preview page will show the view of the plan that the collaborator will see. If you would like to edit any level of access, add or subtract any departments or modules from the view, click the
"Go back" button to return to Plan Access.
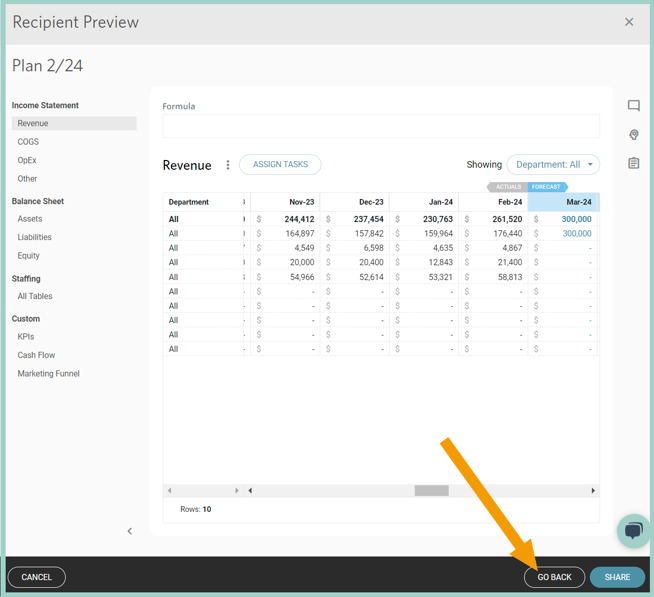
You can then select "ASSIGN TASKS" to move on to Step 3 or choose Share to immediately share the plan (and skip Step 3).
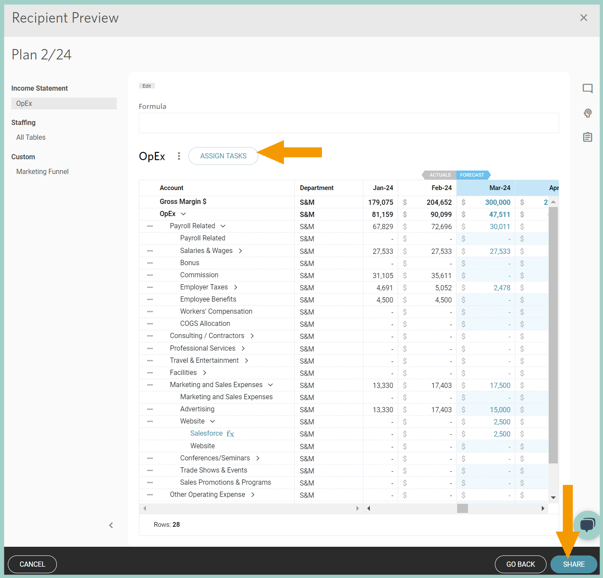
Step 3: Assign Tasks
Tasks can be assigned to collaborators to define the workflow of creating or updating the budget. Select +Assign Task in each desired area, populate the Assign Task fields, and select Save.
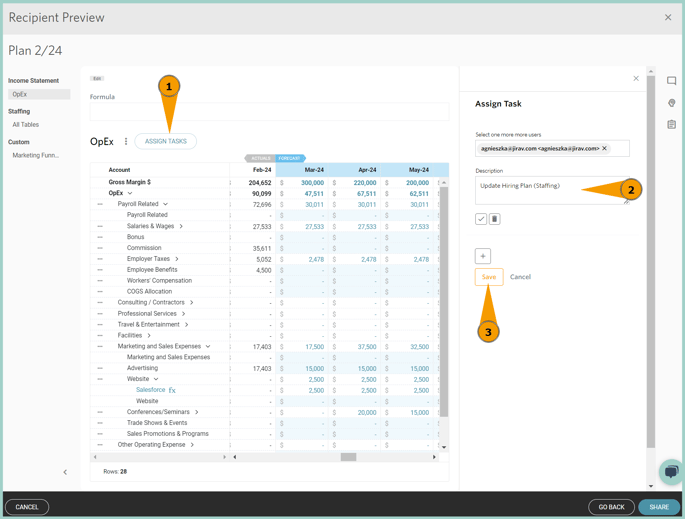
Upon the completion of adding tasks, click the orange Share button to complete the sharing process. This will send an email to the user inviting them into Jirav and to this collaboration.
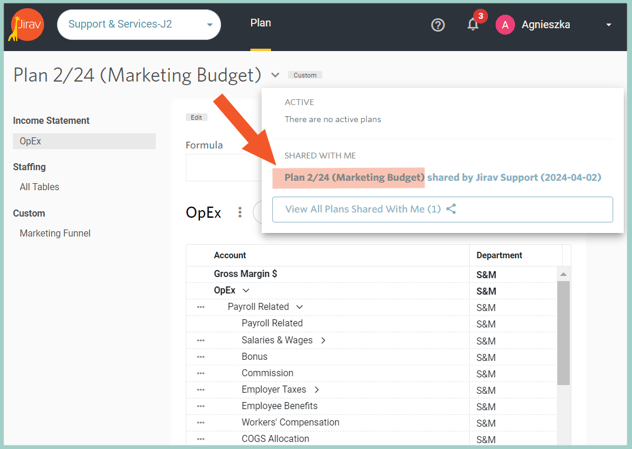
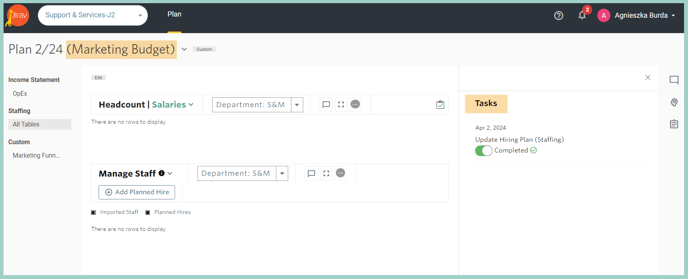
When that user logs in to Jirav, they will only be able to see what was shared with them via the Plan view and based on their Role.
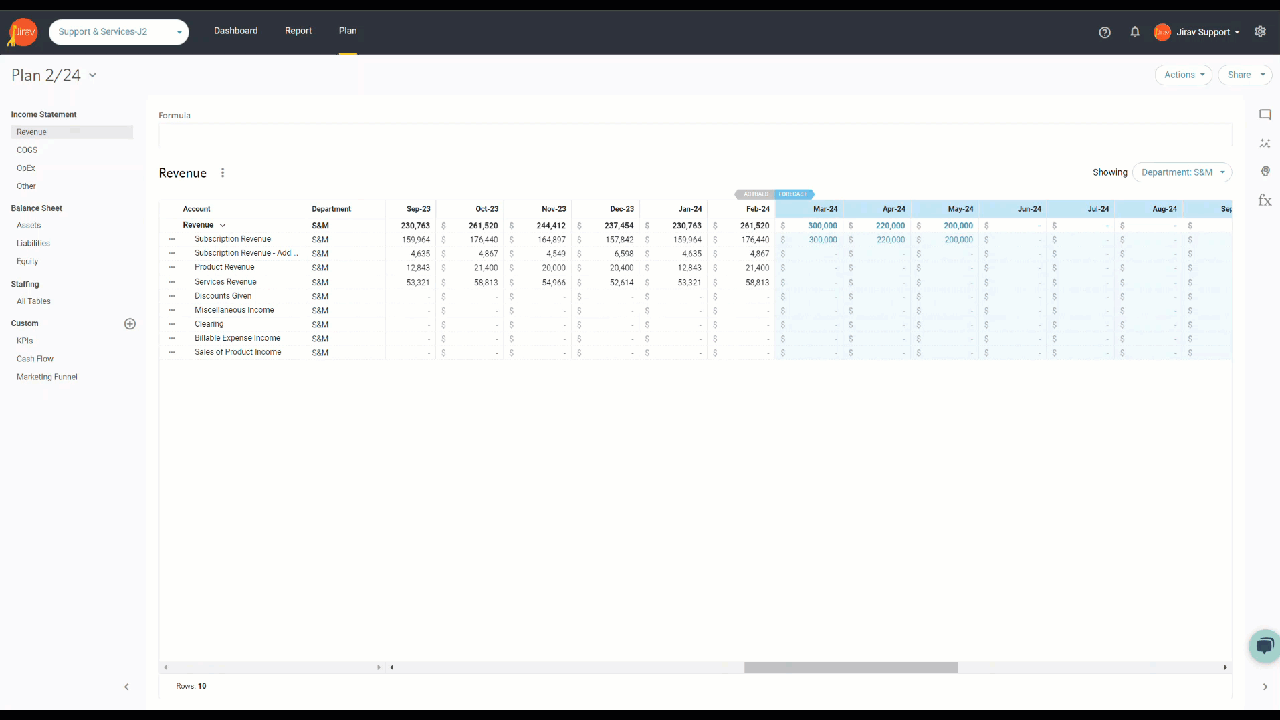
For example, the screenshot below reflects a Custom Access view that only grants access to the Staffing and OpEx tables for the Sales & Marketing Department and the Marketing Funnel custom table in the 2022 Budget plan.
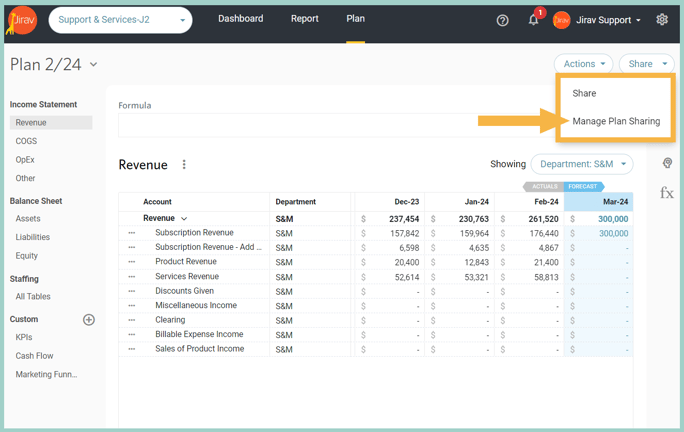
Managing Existing Plan Shares
To edit the Plan access, preview, manage tasks, delete, or share the plan view with additional users, navigate to the planning area of the application, select the desired Plan, select the chevron to the right of the 'Share" button and choose "Manage Plan Sharing":
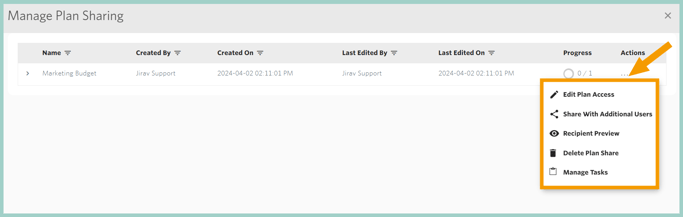
The Plan Share Management Page also provides visibility into when the collaborator last viewed or made edits to the shared plan and shows the progress of any assigned tasks.
Helpful Hints:
- Sharing Plans does not allow adding new Drivers or adjusting existing Drivers
- It is not possible to grant Edit access to a Plan of Record (POR)
- Cloning a Plan does not clone the Share views