Workforce Forecasting
Staffing costs are generally a large percentage of a Company’s total spend. Jirav makes forecasting headcount easy by importing the Company’s active roster, planning for additional headcount as the company grows or planning for reduction in force if the Company is facing cost-cutting measures, and building in annual raises to the salary forecast.
Article Contents
- Actual Staff
- Planned Hires
- Terminations
- Raises
- Salary Forecast
- Fully Burdened Headcount (Payroll Tax, Benefits, Etc.)
- Allocations (multiple Salary accounts)
- Bi-Weekly Payroll
- Hourly Employees
- Actual Staff with Hire Date in Forecast Period (Grayed Out Employees)
- Additional Resources
- Starting the Advisory Conversation
Importing Actual Staff
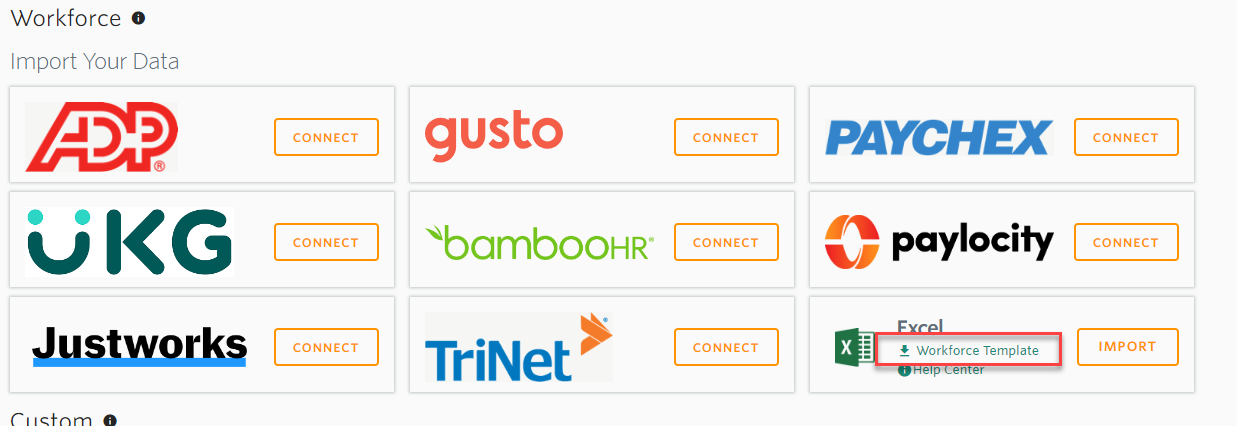
- Connect to workforce system
- Jirav has integrations with: Gusto, Justworks, Trinet, Paychex Flex, Paylocity, Run Powered by ADP, UKG Ready, BambooHR. Click here for detailed instructions.
- Jirav will sync your current employee roster with the included fields: Department, Role, Full Name, Hire Date, Annual Wages, and a UniqueID (which we associate certain planning elements to).
- Import via excel
- If Jirav does not have an integration with your workforce system or there are limitations with the way employees are imported from the integration, we can manually import the Company’s active employee roster via excel import.
- You can download the template to upload your staffing roster from Settings ⚙️ > Your Company > Actuals
- The required fields are: First Name, Last Name, Department, Email (or any identifier that will not change), Hire Date, Termination Date (Optional), Annual Compensation Amount, and the Compensation Unit: Year. Once the excel file is populated, you can return to Settings ⚙️ > Your Company > Actuals and hit Import next to Excel.
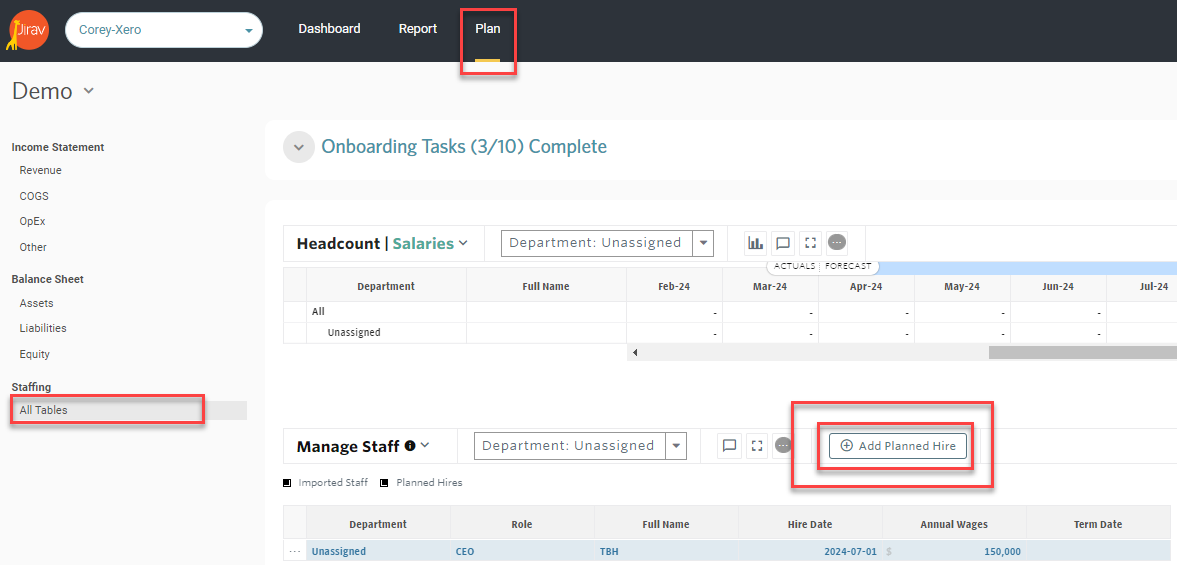
Planned Hires
We plan for additional headcount using Planned Hires or Driver Based Hires.
- Planned Hires:
- You should add Planned Hires to your staffing plan for specifically identified roles to be hired at a specific time.
- You can Add Planned Hires within the Plan>Staffing section in Jirav. The fields to populate include: Department, Role, Full Name (or TBD/TBH), Hire Date, Annual Wages
- When Planned Hires are added to a Plan, you will see the increase to headcount and salary expense in the month of the planned hire.
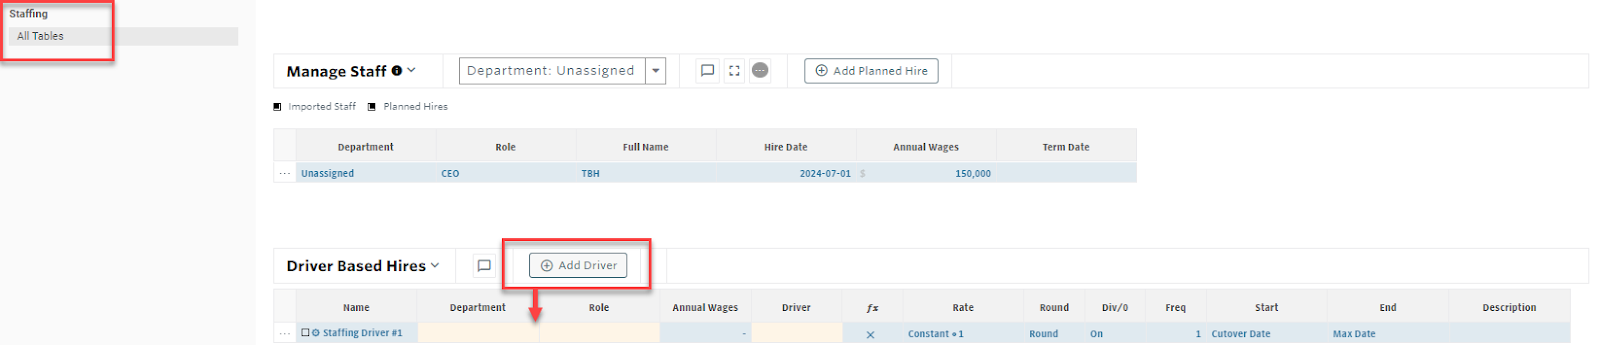
- Driver-Based Hires:
- While some roles and timing of hires may be specifically identified, there may be roles that you want to forecast additions for based on company growth (or some other metric). For these roles, we can use Driver-Based Hires.
- Driver-Based Hires functionality allows formulaic hiring within the Plan. For Example, a Driver-Based Hire should be used if you need to have a Customer Success Rep for every 100 customers.
- To do this, you would select “Add Driver” in the Driver-Based Hire section of the Staffing Table within a Plan.
- Create the Driver with a salary representative of the average for the given department and role. Then, choose the desired Driver & Rate to trigger the new hire. If we continue with our example of needing a Customer Success Representative for every 100 customers, our Driver would be Cumulative Customers (captured in a Custom Table) and our Rate would be 100.
- If the role you want to hire using Driver-Based Hires is a new role (no active staff in the role), you will need to create the role in order for it to be selected while building the Driver-Based Hire. To create the role, add a ‘Placeholder’ planned hire in the staffing table (via ‘Add Planned Hire’). Enter a hire and termination date in the same month in some historical month so that the role can be selected in the Driver-Based Hire setup.
Planned Terminations
To plan for attrition, add a Term Date to an employee who is planning to leave the company. this will stop both salary and headcount from calculating after that date.
Planned Raises
Salary increases at specific points in time can be planned within the Staffing table at the individual employee level by entering a Planned Raise.
To plan for a raise, select the ellipsis (. . .) to the left of the employee who should receive the raise and choose Plan Raise. You will then be prompted to enter the effective date of the raise and can then choose to input the incremental increase as a $ amount or a % of salary.
Planned Raises are only effective for one salary increase. For multi-period increases, a planned raise should be added for each period.
While the Planned Raise feature in the Staffing Table is the best practice for planning raises, we understand it can be cumbersome to plan multi-year raises for many employees. Instead of using Planned Raises, you can plan for salary increases directly within the salary forecast line in the P&L. To do this you can:
- Let’s use an example of 5% annual raises occurring every January. In this instance, we would want to take total salaries in the previous December and multiply that amount by the 5% increase with a start date of the first increase.


- In order to access the December of prior year in each year of the forecast, we will need to set a static range to represent LY FYE (last year fiscal year-end). For a raise that begins in January 2025, the range would be set to December 2024 - December 2024.

After completing his step, you can see the impact the driver has on the salary forecast. It add 5% of the Dec-24 ending total salaries to all salary totals in 2025 and beyond. To create another compounding raise to happen in the next fiscal year, for this example in January 2026, the above steps need to be replicated. The Ranges for the 2026 range will be Dec 2025 - Dec 2025 and the Start Date will be set to January 2026. Important to note, both raise drivers (for 2025 and 2026) need End Dates set to Max Date in order for the raises to compound. By having separate drivers for each year's raises, different raise % inputs can be applied by year.
Salary Forecast
Now that we have current and forecasted monthly wages, we need to map this expense to our P&L.
First, we should establish a default salary account to configure system salary expense. If there is only one salary account, we should designate that account as where to map ‘System Salaries’. If there are multiple salary accounts, first designate one default System Salaries account and then use allocation drivers (explained below) to move salaries from the default account to other salary accounts.
We establish the System Salary Account in Settings ⚙️ > Company > Plans > Salary Expenses


Fully Burdened Headcount Expenses
- Payroll Taxes
- To forecast PR Taxes, we should use the ‘% of another account’ driver and create a key assumption for a PR tax rate
- If utilizing multiple salary accounts, create a ‘% of another account’ driver for each salary account.
- Benefits/Insurance
- To forecast Benefits or Insurance Expense, we can generally use the ‘$ amount per headcount’ driver and create a key assumption for the Benefits/Insurance cost per head.

- 401k
- To forecast 401k expense, we should use the ‘% of another account’ driver and create a key assumption for a % of Salary that is subject to 401k expense
- Bonus Expense
- To forecast Bonus expense, we can either plan it directly in the OpEx (or COGS) table by taking a % of Salary or build a more detailed calculation in a custom table based on a bonus plan.
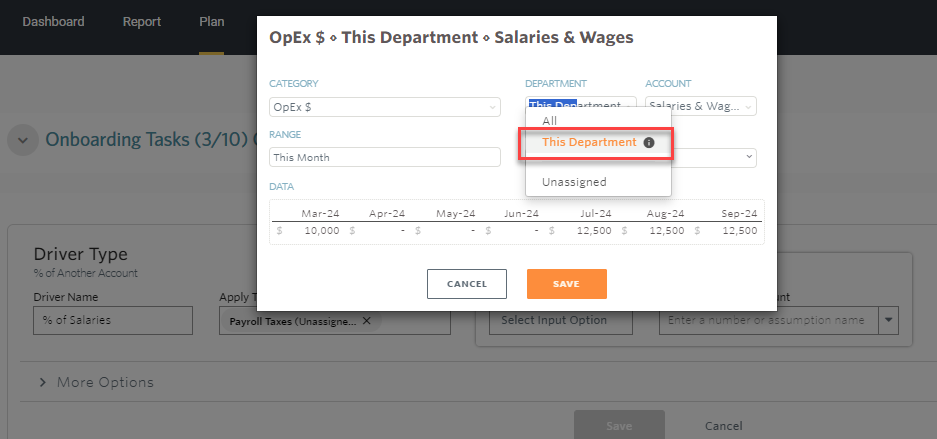
- If any of these costs should be forecasted by department, be sure to utilize ‘This Dept’ in the driver set-up so that the same driver for each account can be applied to each department without needing to revise each driver.
Salary Allocations
The salary expense for all employees will flow to the salary expense account as defined in Company Setup. There may be a case where you'd prefer some of the planned salary expenses to flow to a different account or different department. For example, wages for the R&D Department should flow to COGS rather than OpEx. Or, perhaps the CEO is allocated between Sales and G&A. An Allocation Driver can be used to achieve this.
- To create an Allocation Driver to move Salaries between accounts or departments, go to Plans > Drivers > Locate the Allocation section and select ... + Add Driver.
- Then, populate the Driver as follows:

-
- Name: Use a relevant name to describe the allocation you’re performing. This name will show up as the driver name within the Plan.
- Allocation In: Select the Account/Department you want to move wages to
- Allocation Out: Select the Account/Department you want to move wages out of
- Amount: Find the staffing section in the picker, and select the department or role you want to allocate
- Allocation Ratio: Portion of the Amount that should be allocated, e.g., a Constant of 1 indicates 100% of the selected Wages to be allocated and a constant of 0.50 indicates 50% of the selected Wages to be allocated
- Start: Date allocation should begin calculating, defaults to Cutover Date
- End: Date allocation should stop calculating, defaults to Max Date
- Description: Optional text field
Bi-Weekly Payroll
- The Jirav system salaries will always calculate monthly wages as 1/12th of annual salaries.
- This article explains how to adjust the system salaries to account for 26 pay periods for bi-weekly payroll using Custom Tables or manual adjustments.
- It is important to first consider whether the variance between 24 and 26 pay periods materially impacts the organization's financial statements and key performance indicators. If deemed necessary, here are several approaches to review to adjust the system salaries for 26 pay periods:
Hourly Employees
- Jirav will annualize the salaries for any employee imported with an hourly rate using an assumed average hours per week.
- The average number of hours used to annualize the salaries can be found in Settings ⚙️ > Company. This is initially set to 40 hours (full-time workload), but can be adjusted.
- If it does not make sense to annualize the Salaries for all employees using this methodology, Staffing will need to be managed with Excel import.
- This article explains how you can adjust your staffing file to account for hourly, part-time workers.
Imported staff with hire date in the Plan’s forecast period
- Actual staff imported from the payroll system with Hire Dates in the Forecast Period of the currently selected Plan will not automatically be included in salary & headcount totals.
- To include these hires in the forecast, add them as a planned hire by clicking on the ellipsis menu (. . .) to the left of the gray italicized row and selecting Clone Planned Hire.
- Once the Plan is rolled forward and the Hire Date of the row representing the actual employee is now in the Actuals Period (and displayed in black, non-italicized text), the planned hire (blue row) should be removed so as to not double count the employee in the plan
Additional Resources
- This article provides a basic overview of Navigation in the Staffing Table
- See this Learning & Education Video to help get you started. You can earn CPE for watching this training and completing the quiz in the Earmark CPE App.
Workforce Forecasting Advisory Questions
Staffing Costs Overview
Staffing costs represent a significant portion of a company's total expenses. Using Jirav, you can easily forecast headcount by importing the company’s active roster, planning for additional headcount as the company grows, planning for reductions in force if facing cost-cutting measures, and building in annual raises into the salary forecast. Below are advisory questions to help clients optimize their workforce forecasting and instructions on incorporating the answers into the financial model in Jirav.
Suggested Advisory Conversation
Current and Future Staffing
- What are your growth plans over the next year?
Plan for additional headcount by adding planned hires with details such as department, role, hire date, and annual wages.
- Are there any expected reductions in force due to cost-cutting measures?
Plan for reductions by adding termination dates to employees,
- Do you have any key roles identified that need to be filled?
Add these specific roles as planned hires to ensure they are accurately reflected in the financial model.
Salary and Compensation Planning
- What are your annual raise plans for the next few years?
Plan salary increases directly in the staffing table by entering the effective date and raise amount or percentage.
- Do you anticipate any changes to the structure of bonuses or additional compensation?
Adjust the Bonus assumptions in the model to reflect these costs.
Payroll Taxes and Benefits
- What are your payroll tax rates and benefits costs per employee?
Adjust the payroll tax rate & benefits drivers & assumptions in the model to reflect these costs.
- Do you offer a 401k plan, and what is the employer match rate?
Adjust the 401k drivers & assumptions in the model to reflect these costs.
Workforce System Integration
- Which workforce system are you currently using?
Integrate Jirav with the workforce system to import the current employee roster, including fields like department, role, full name, hire date, and annual wages. Manually import the employee roster via Excel if integration is not available.
Driver-Based Hiring
- Do you need to scale your workforce based on company growth or other metrics?
Use Driver-Based Hires to forecast additions based on company growth metrics. For example, hire 1 CSM for every 50 customers.
Salary Allocations
- Do you need to allocate salaries to different accounts or departments?
Create Allocation Drivers to move salaries between accounts or departments.
Additional Considerations
- Are your employees paid bi-weekly?
Adjust the system salaries to account for bi-weekly payroll as described in this guide.
- Do you have any hourly employees?
Manage hourly employees as described in this guide.
- Are there any recent hires with start dates within the forecast period?
Include these hires in the forecast by adding them as planned hires, and remove them to avoid double-counting once the hire date is in the actuals period.