Plan Drivers are a highly effective tool that can be utilized to predict the value of accounts in your financial plan by establishing rules, growth rates, targets, assumptions, and other interdependencies. For example, all of the below could be modeled using plan drivers:
- Calculate product revenue as a function of units * price
- Purchase a laptop for each new hire and show the effect to fixed assets on the balance sheet as well as depreciation on the income statement
- Hire a new customer success representative for every 100 new customers
- Set a budget of $12,000 for the year that automatically recalculates based on YTD actuals as the forecast is rolled forward
- Allocate Rent to departments based on Headcount
Article Contents
- Plan Driver Architecture Overview
- Standard Plan Drivers (Income Statement & Custom Plan Tables)
- Balance Sheet Drivers
- Allocation Drivers
- Prepaid & CapEx Asset Drivers
- Staffing Drivers
- Driver Management: Reviewing, Editing, Deleting, Bulk Updates
Did you know?
There are two types of drivers available in Jirav, Plan Drivers & Global Drivers. All Drivers described in this article are Plan Drivers. Global Drivers only exist in Custom Tables, are the same across all Plans (with the exception of PORs) and are appropriate for KPI calculations like EBITDA (Earnings before Interest, Tax, Depreciation and Amortization) where the formula will never change.
Plan Driver Architecture Overview
- Drivers are formulaic expressions that can be used to forecast the Income Statement, Balance Sheet, Custom Tables as well as Headcount by department & role.
- Expanding the account or custom line name will expose any associated drivers. Clicking on the driver row will then display the corresponding formula at the top of the table.

- There are 5 categories of plan drivers: Standard, Allocation, Prepaids & CapEx Assets, Balance Sheet & Staffing.
- Drivers are additive in nature meaning a single account or line can have multiple drivers associated with it.
- Standard Drivers can be added in bulk to multiple accounts & departments in one action.
- Drivers can apply to all time periods or to a specific time period.
- Drivers utilize the Universal Addressability Picker to create references to variables and constants.
- Inputs can be created as Assumptions to streamline scenario planning.
Standard Plan Drivers
Standard plan drivers are available within the Driver Library from the Income Statement (Revenue, COGS, OpEx, Other) and Custom Plan Tables. These drivers are specifically designed to encompass the most common planning methodologies.
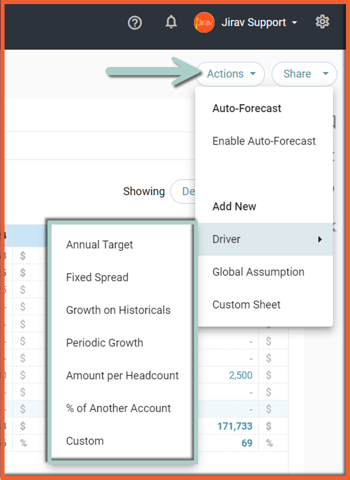
- Annual Target: Input as an Annual Amount that reallocates based on YTD actuals for the remainder of the year
- Fixed Spread: Input as an Annual Amount that does NOT reallocate based on YTD actuals
- Growth on Historicals: Forecasts the future using the historical annual growth rate (requires 2 years of actuals)
- Periodic Growth: Grows the value periodically either by a % or $ amount
- $ per Headcount: Calculates as an input $ per Cumulative or New Headcount
- % of Another Account: Calculates as input % of another account
- Custom: Customize a formula with any variable that exists in Jirav
Visit the Standard Drivers help article for additional information about the fields within each driver type and the corresponding formula logic.
Adding New Standard Plan Drivers
To add a Standard Driver from a plan table, navigate to the desired plan table and either:
- Select the Actions > Add New > Driver button from the toolbar, choose the desired Standard Driver type, select the account(s) and department(s) to apply the driver, populate the applicable inputs and Save.
OR - Select the ellipsis (...) to the left of an account to open the context menu, choose the desired Standard Driver type, and optionally update the account(s) & department(s) to apply to the driver (the driver output will automatically default to the account & department of the row), populate the applicable inputs and Save.

Visit the Standard Drivers article for additional information about the fields within each driver type and the corresponding formula logic.

Balance Sheet Drivers
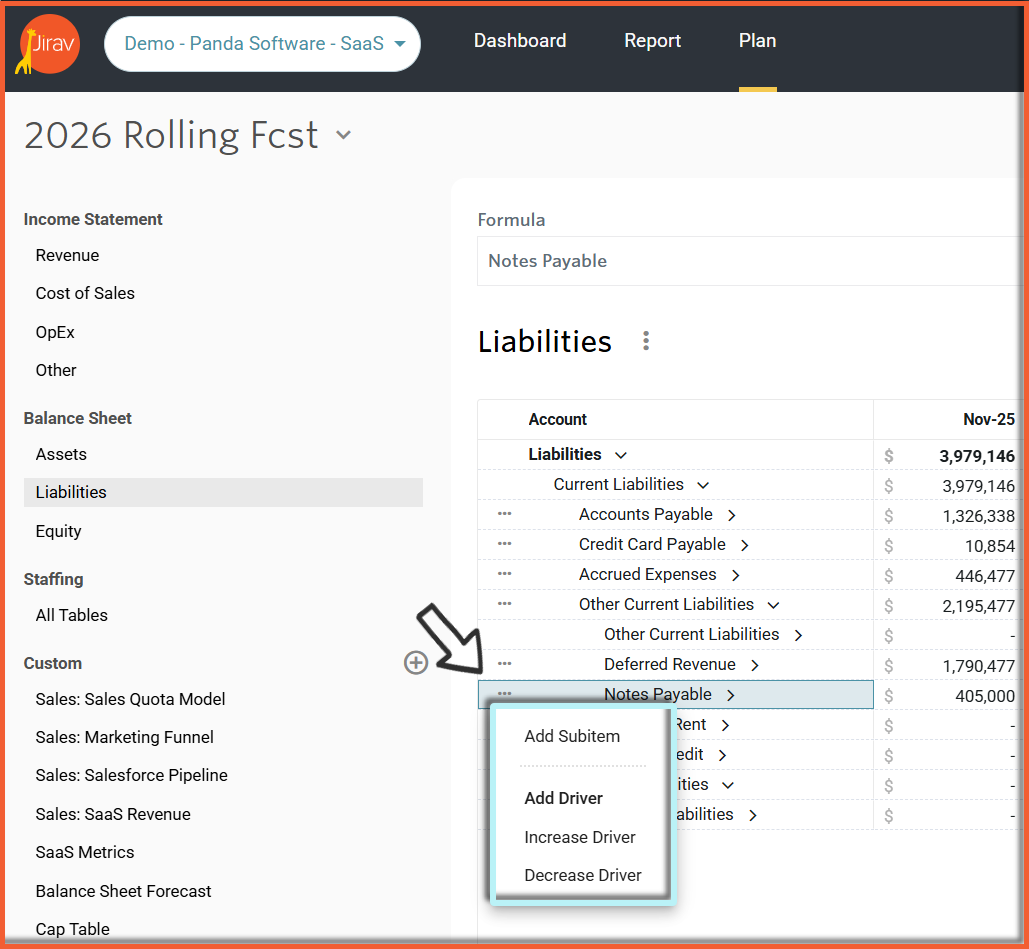
Balance Sheet Drivers are available for any Asset, Liability, or Equity account and are expressed as either an increase or a decrease to the previous month's balance. For example, the increase to accounts receivable could be equal to the forecast for monthly invoices issued and the decrease could be equal to forecasted cash collections.
To add a Balance Sheet Driver:
- Click on the ellipsis (...) to the left of an account to open the context menu and choose the Driver Increase or Decrease
-
Navigate to Plan Drivers by selecting the fx from the left menu, locate the Balance Sheet section, and select + Add Driver.

Allocation Drivers
Allocation Drivers are available in the Income Statement to allocate values between accounts and/or departments. For example, you might use an Allocation Driver to allocate facilities expense to each department based on departmental headcount.
To add an Allocation driver, navigate to Plan Drivers by selecting the fx from the left menu, locate the Allocations section, and select + Add Driver.
Once an allocation driver is added, it can be reviewed, edited, cloned and deleted in line from the Income Statement (Revenue, COGS, OpEx, Other) plan tables.

Visit the Allocation Drivers article to learn more about the fields available for this driver type.
Prepaid & CapEx Asset Drivers
The Prepaid & CapEx Assets module is available to plan for any amortizable asset. For example, you might use a CapEx Asset driver to plan for the purchase of computer equipment for each engineering new hire.
To add a Prepaid & CapEx Asset driver, navigate to Plan Drivers by selecting the fx from the left menu and locate the Prepaids & CapEx Asset and Prepaid & CapEx Drivers sections.

There are two sections associated with Prepaids & Capex drivers. In the first section, Prepaids & CapEx Assets, define the characteristics of the asset. Then, in the Prepaids & CapEx Drivers section, trigger when the asset should be purchased.
Visit the Prepaids and CapEx Drivers article to learn more about the fields available for this driver type.
Staffing Drivers
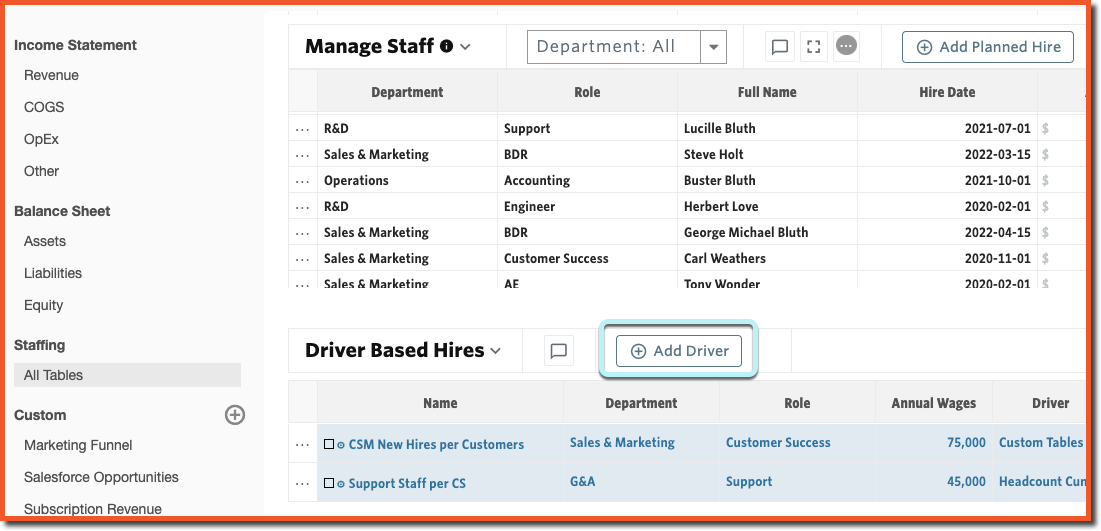
Staffing drivers are available to plan for increased headcount by department and role as related to business growth rather than by individual hire. For example, you might use a Staffing Driver to plan for the addition of technical support representatives based on the number of customers you are planning for.
To add a Staffing Driver, navigate to Staffing > All Table, locate the Driver Based Hires section and select + Add Driver.
Visit the Driver Based Hires article to learn more about the fields available for this driver type.
Driver Management: Reviewing, Editing, Deleting, Bulk Updates
Reviewing
Access a comprehensive aggregation of all the Plan Drivers in your plan from the fx menu on the ride side of the screen. The drivers are organized into sections based on the financial statement and/or driver type. From this screen, you can review the drivers and make updates such as adding new drivers, cloning drivers, updating driver inputs, and deleting drivers. 
Helpful Hint:
Keyboard shortcuts are supported in the Driver Map screen. For example, use Ctrl+F to quickly find where a Custom Line is referenced or use copy+paste to update the Start Date for multiple drivers from Cutover Date to Min Date.
Editing Existing Drivers
To Edit an existing driver, click on the account with a driver to expose the driver(s), select the driver row that you'd like to edit then click on the pencil ✏️ icon from the formula bar. Alternatively, you can click on the ellipsis (...) to open the context menu and select Edit Driver or double-click the row.

Deleting Existing Drivers
To Delete an existing driver, click on the account with a driver to expose the driver(s), select the driver row that you'd like to edit then click on the Trash 🗑️ icon from the formula bar. Alternatively, you can click on the ellipsis (...) to open the context menu and select Delete Driver.

Multi-select drivers will enable a bulk deletion.

Bulk Driver Updates
There are two ways you can streamline the addition of new drivers in your model, Cloning & Bulk Drivers.
Cloning creates an exact copy of an existing driver. Cloning is most appropriate when you are adding a new, similar item, e.g., a new department, to an existing model. For example, let's say you are using Custom Drivers to calculate Bonus for each Department as Salary * an Assumed Bonus % and you just added a new Department to your company. In this scenario, you could clone the Bonus driver from an existing Department into the new Department.
Bulk Drivers create multiple Drivers in one action across multiple account(s) and/or department(s). Bulk Driver Addition is most appropriate when you are creating an entirely new model. This is often only used during an initial model implementation but is also available for use post-implementation. For example, let's say you have a brand new Jirav model and want to set up drivers for each Department to calculate Bonus as Salary * an Assumed Bonus %. In this scenario, you could use Bulk Drivers to create a Custom Driver for each Department in one action.
Cloning Drivers
To Clone an existing driver, click on the account that contains the driver you'd like to clone to expose the driver(s), select the driver row that you'd like to clone then click on the ellipsis (...) to open the context menu and select Clone Driver or Clone Driver To.

-
- Clone Driver:
Creates an identical copy of the driver that was cloned including cloning it to the same Account & Department. Be sure to edit the cloned driver to make any applicable updates. For example, if you intend to clone the driver into a new department, you'll want to update the department under Apply to Account(s) & Department(s) accordingly.
- Clone Driver To:
Presents you with a New Driver prompt where the fields are an identical copy of the driver that was cloned except for the apply to Account(s) & Department(s) field is blank. Populate this field as desired then Save.
- Clone Driver:
Adding Bulk Drivers
To bulk create a driver across multiple account(s) and or departments(s), select Add Driver from the desired Plan table and update the Apply To account(s) & Department(s) field to include all applicable account(s) and department(s). Then populate the additional applicable inputs and Save.

Editing Drivers in Bulk
After Drivers are created, it is possible to quickly make an update to them as long as the inputs are the same. For example, let's say you set all of your G&A Expenses to use a Trailing 3 Month Average + 5% Quarterly growth using a Periodic Growth Driver, but after analyzing the data you decided a Trailing 6 Month Average would be more appropriate. To update your existing drivers in bulk, edit one of the existing drivers and toggle to Edit All Drivers With Same Inputs from the top right side of the edit driver prompt.


Be Aware:
- The formula bar style display of Drivers is available in the Revenue, COGS, OpEx, Other, and Custom Plan Tables. Support for the formula bar display in Assets, Liabilities, Equity, and Staffing may be included in a future software update.
- A driver type cannot be changed after it is changed. For example, it is not possible to change a Growth on Historicals driver into a $ per Headcount driver. The unwanted driver should be deleted and then replaced with the newly desired driver type.