The Month-End Process includes these steps:
- Create a POR Clone of the Current Plan & update Actuals in the Current Plan
- Check System Health
- Verify GL Actuals are Up to Date
- Review Imported Workforce Roster
- Review Imported Actuals Custom Data
- Review Imported Budget Accounting and Custom Tables data
- Update other Assumptions, Drivers, and/or Manual Inputs
- Verify the Close Month
- Update Reports & Dashboards
- Publish and Share Reports & Dashboards
☑️ Step 1: Create a POR Clone of the Current Plan & update Actuals in the Current Plan
Before the forecast is rolled forward, it is recommended to create a clone of the current plan and make it a POR (plan of record). These actions create a snapshot of that plan as of this point in time. This gives you the option to revert back to the previous plan (without updated actuals) and/or compare it to the new plan as needed.
To designate the current reporting plan as a Plan of Record, go to Plans 📈 > Select the ∨ next to the current Active Plan to open the context menu > Select Manage Plans > Click on the hamburger menu to the left of the desired Plan to activate the context menu and select Clone. Then scroll down to the Archive Section, rename the cloned Plan, and click on Make PoR.-gif.gif?width=1280&height=720&name=Rolling%20Forecast%20(1)-gif.gif)
Now that a clone of the current plan has been created for reference, the current plan can be updated to include YTD Actuals. Updating the current plan that is already referenced in forecast Reports & Dashboards should result in no additional action needed to update your forecast Reports & Dashboards since they already reference the current plan.
Navigate to Manage Plans and update the Actuals Period to bring the most current month of Actuals. The first month of the Forecast Period will be updated automatically. Save the changes.
-gif.gif?width=688&height=720&name=Rolling%20Forecast%20(3)-gif.gif)
☑️ Step 2: Check System Health
Verify that your accounting actuals have recently been imported to Jirav.
Check for any System Health notifications alerting you that accounting actuals have been disconnected from Jirav. A System Health notification appears as an orange triangle with an exclamation mark (![]() ) and will appear in the upper right-hand corner of Jirav.
) and will appear in the upper right-hand corner of Jirav.
- If there are no System Health notifications regarding failed data imports, move on to Step 3.
- If the last data import failed, go to Setting ⚙️ > Integrations and reconnect your Accounting System.


Additional Resource: Actuals and Jirav
☑️ Step 3: Verify GL Actuals are Up to Date
The accounting integration will import data for the prior two months automatically*. If there was an accounting adjustment made to previous periods, Actuals in Jirav should be updated accordingly.
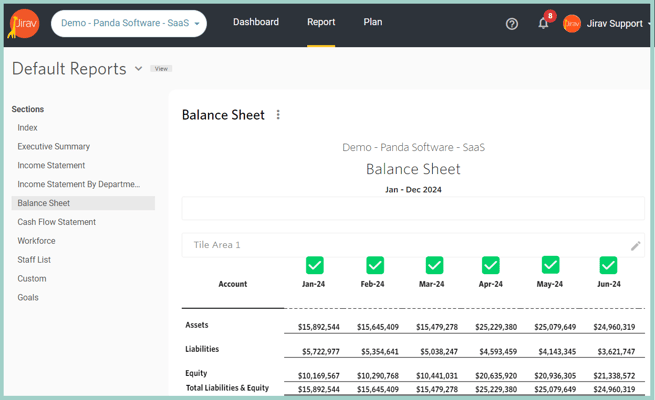
A quick way to verify Actuals are up to date is to verify your Balance Sheet is in balance. To do this, go to Reports 📋> Default Reports > Balance Sheet and confirm Assets are equal to Total Liabilities & Equity.
- If Assets are equal to Total Liabilities & Equity, move on to Step 4.
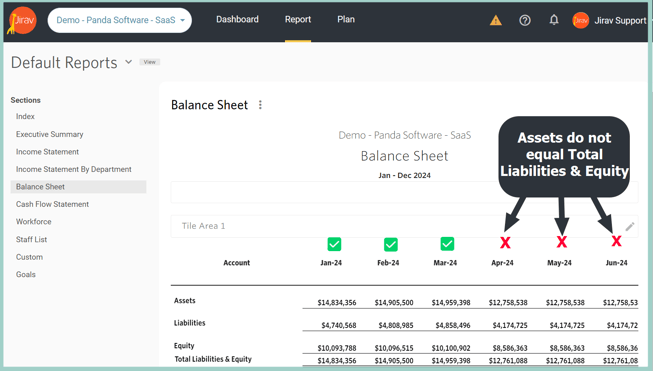
- If Assets are NOT equal to Total Liabilities & Equity, go to Settings ⚙️ > Integrations and Import data for all historical accounting periods that have recently been adjusted in the accounting system.

*with the exception of the QuickBooks Desktop integration which always runs on-demand
☑️ Step 4: Review Imported Workforce Roster
To ensure accurate actuals vs budget headcount reporting by department & role, the Actual roster of employees should be kept up to date in Jirav.
- If there have not been any staffing changes within the last month, move on to Step 5.
- If there have been staffing changes within the last month, an updated roster should be imported from the Workforce section of Settings ⚙️ > Integrations.

Additional Resource: Import your Workforce & Rolling Forecast Checklist: Reconcile Staff
☑️ Step 5: Review Imported Actuals Custom Data
To ensure accurate actuals vs budget for Actuals Custom data, the Actual import template for Custom data should be kept up to date in Jirav.
- If you are not tracking any custom data actuals in Jirav, move on to Step 6.
- If you are tracking custom data for Actuals, the Actuals Import Google Sheets or Excel Template should be imported from the Custom section of Settings ⚙️ > Integrations.

Additional Resource: Import Custom Table Actuals from Google Sheet or Excel
☑️ Step 6: Review Imported Budget Accounting and Custom Tables data
To ensure accurate actuals vs budget for Actuals Custom data, the Actual import template for Custom data should be kept up to date in Jirav.
- If you are not importing any Budget Accounting or Custom data in Jirav, move on to Step 7.
- If your Plans are based on the import for planned Accounting (Income Statement & Balance Sheet) and/or Custom Tables, the Budget Import template should be imported from the Budget section of Settings ⚙️ > Integrations.

☑️ Step 7: Update other Assumptions, Drivers, and/or Manual Inputs
See if any additional updates should be made to assumptions, drivers &/or manual inputs. One way to quickly identify & prioritize the areas that should be looked at first is to run a report that compares the previous forecast to the same period of actuals, e.g., February Forecast vs February Actuals. For line items showing larger variances, drill into the drivers and assumptions associated with that line item to see if they should be updated.
- If you confirm no changes to the Assumptions, Drivers and/or Manual inputs should be included move on to Step 9.
- Go to the Assumptions area and update Assumptions as needed. For example, if a new employee benefit has been added since the previous forecast, you could change the Benefit Rate % assumption in the model.

- Go to the Drivers tab and check to make sure there are no driver errors.
- If collaborating with other users, invite them into the new Rolling Forecast to make their updates.
Additional Resource: Introduction to Planning with Drivers, Assumptions & Sub-Items
☑️ Step 8: Verify the Close Month
Dashboards & Reports can be set up to automatically display Actuals through the Close Month. If you are taking advantage of this feature, you'll want to confirm that the close month is set properly in either your accounting system or Jirav, depending on your settings.
Depending on your settings, the “Close Month” is determined either by Jirav or by your accounting system. This setting can be reviewed from Settings ⚙️ > Company > Accounting > Close Month.
- If the Close Month is set to a Specific Date, that means the close date is managed within Jirav and you can update it accordingly from this page.
- If the Close Month is set to your Accounting System Close Date, e.g., QuickBooks Close Date, the close date will be read-only and can only be changed by adjusting the close date from within your Accounting System.

Additional Resources: Close Month and Close Month on Tiles
☑️ Step 9: Update Reports & Dashboards
Prior to publishing and sharing results, verify the data sources and ranges referenced in tiles & reports and update any text elements.
- On Dashboards, edit tiles to review the data source(s) displayed and update as needed.

- On Reports, edit columns to review the data source(s) displayed and update as needed.

- Update text tiles as needed.
- Update text pages in report templates as needed.
- Add new reports and tiles as needed.
- Update formatting as needed.
Additional Resources: Variance Analysis in Reports, Dashboard & Tiles Overview, Report Templates
☑️ Step 10: Publish & Share Reports & Dashboards
Now that you have verified all of your Actuals data has been updated, publish and share the results with stakeholders. Publishing a report template creates a hard-coded version of the report that will not change.
Reports- Select the Publish icon when viewing your month-end reporting template. Publishing your template will produce a hard-coded copy of the report that can then be shared out with users as needed.

Share the Published Report Package using the Share button.

Click the Comment icon to make comments for your users. All users with access to view the Published Report will see the comments when they log in.

Optionally export the Published Report Package to PDF, Excel of Google Sheets:

Dashboards
Select the Share icon to grant or remove view access to each Dashboard.

Click the Comment icon to make comments for your users. All users with access to view the dashboard will see the comments when they log in.
Additional Resources: Reporting Templates & Published Packages, Published Reports